


This diy site rocks! Suggestion are welcome to improve my project. Especially in woodworkiing areas. I had been doing this for the past 7 years. It has now progress to the use of led as light source.
Step by Step guide in buidling your own cheap lcd projector-For movies,gaming,karaoke and outdoor use
Materials Needed.
A> Lenses
1. Projection lens- Magnifies the image of the lcd
2. Fresnel lens
a. Field fresnel - Converged the lighted image of the lcd to the projection lens
b. Collimator fresnel- Focuses on the lamp. Collects the light from the lamp and transmit parallel light rays to the lcd.
3.Front surface mirror-optional
4. 12v dc power supply for fans and lcd-use pc power supply
B>Light Engine
1. Metal halide bulb- 150w -250w: high lumens/ color temperature bulb
2. Ballast- Controls the power delivered to the lamp
3. Capacitor- Power factor corrector. power saver
4. Ignitor- Start up the lamp creating 3.4kv sparks to fire the chemical inside the lamp
5. Reflector- Recovers wasted light from the lamp
6. Condenser lens - Increase light collecting efficiency and divert more light to collimator fresnel
7. IR/UV filter- reduce temperature of lcd created by heat /infrared radiation generated by the lamp. Reduce UV rays to prevent discoloration of lcd.
Others
1. Front surface mirror- bend the light to make the box smaller
2. 2-units blower fans - cool down all the parts inside the projector
3. Fan grill- use for mounting parts of the light engine
4. bolts and nuts of diff sizes
Step 1- Choosing your lcd.
Consideration choosing the right LCD for your need.
A> LCD size
DIY projector normally is bigger , or alot of times, alot bigger than commercial projector. Size normally is the first issue.
1. If size is not an issue, then there are alot of cheap used LCD out there with digonal size of 15 inches with xga resolution, very good enough to project high definition images.
2. If size is a problem, then its gonna take alot of effort to get compatible LCD. But if you have the money to spend, you can easily buy on line. Smaller LCD like 8.4 inch diagonal normally has SVGA resolution, few are xga resolution which are very expensive say around $250 on line.
B> LCD resolution
1. XGA Resolution (1024x768 pixel) A bigger LCD say 15 inches and above has xga resoluiton which are capable enough to display high definition images. Smaller LCD with XGA resolution are expensive.
2. SVGA resolution (800x600 pixels) - DVD disk has a resolution of 720x480 pixels so if you have an lcd with svga resolution, it can display the full resolution of dvd players which can display very good images (xga of course is alot better)
3. VGA resolution (640x480) - If you are really low on budget, some small lcd has vga resolution. this can still project good images though your projected image size will be limited otherwise you will see screendoor effect(pixelated) and washout images.
It is not recommended anymore to use lcd with resolution lower than vga resolution.
C> LCD inputs
1. VGA input - Never buy the lcd without vga input (computer video cable) . VGA input can display progressive output from your sources like pc and component output ( need transcoder to convert to vga) of dvd player .
2. HDMI/DVI (digital input) - Some lcd models have DVI input which is very good because some dvd players have dvi output. Very few lcd have HDMI input. DVI/HDMI peforms better than vga interface because it will bypass the A/D converter from dvd players, pc, and lcd monitor. The lesser electronics used, the better is the image quality.
Composite input/ s-video of dvd players only displays 720x240 pixels so avoid using this as much as possible. Remember VGA interface is the minimum requirements.
D> LCD aspect ratio
1. 4:3 aspect ratio- It has the same aspect ratio of regular TV. In the old days, most of the movies are 4:3 so no problem in displaying the correct image size. But nowadays, most movies are widescreen (1.77:1)or letterbox format ( 2.35:1). So you will see black bars in top and bottom of your image. You will lose up to 60% of lcd resolution when you use widescreen and letterbox movies so image quality will go down.
2. 16:9 aspect ratio- When you play 4:3 aspect ratio movie, you will see black bars at the two sides. But nowadays, widescreen are prevalent and you will use full resolution of your lcd and image quality will be better than when using 4:3 aspect ratio lcd.
E> Contrast Ratio - This is other lcd specification that can make lcd cheap or expensive ( the other one is resolution). Higher contrast say more than 1000 can produce beautiful images than with lcd with lower resoltuion. Contrast is the difference in intensity of white and black.
F> Response time- Lower lcd response time means lcd can display moving images smoothly. try to get lcd with response time not higher than 25ms . The lower, the better
G> Number of colors- Look for lcd with 16.7million colors to give accurate color rendition. colors with 200k is also good but will not be displaying the real color.
E> Compatibility- After learning all of the above, you must be sure that lcd is compatible. Compatibkle lcd has only one circuit board attached to the lcd panel.
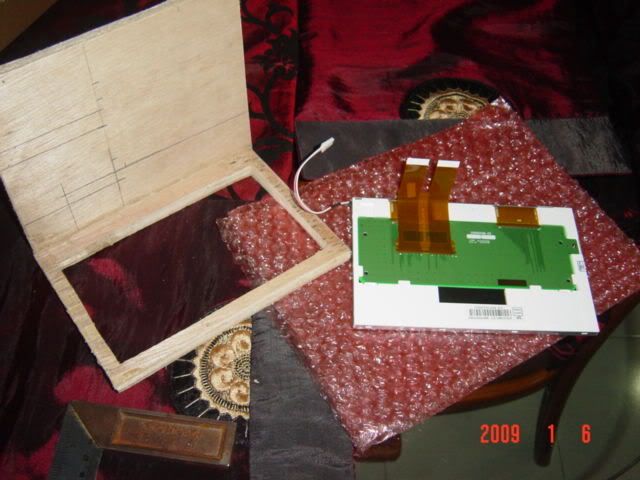
Step 2- LCd strippinng and mounting the lcd in the panel
Strippping of lcd differs from on another. Each lcd is unique in construction. Others are very easy to strip and others will give you hard time. To be sure, just follow the lead of other builders.
Mounting the lcd in the frame: Before stripping the lcd monitor, make sure the frame is ready. You need to know the effective display area of the lcd so that you can make the frame. Use 1/4 to 1/2 marine or ordinary plywood for the frame. Aluminum and steel plate is also very good.
"Mounting of the lcd in the frame is the most critical part of the project". Make sure that the lcd is fully secured and hanging wires should be clamp to the back board. Lcd is the most expensive part of the project so dont take a shortcut. This is a very strong warning to all builders. The flat ( orange cable) ribbon cable connecting the lcd to the A/D board is very fragile. If you break this, then your lcd is dead. totally.
Be accurate in making the frame. The frame open area should be about 0.5mm bigger than the lcd effective display area in all sides. Again be accurate or you will regret this later.
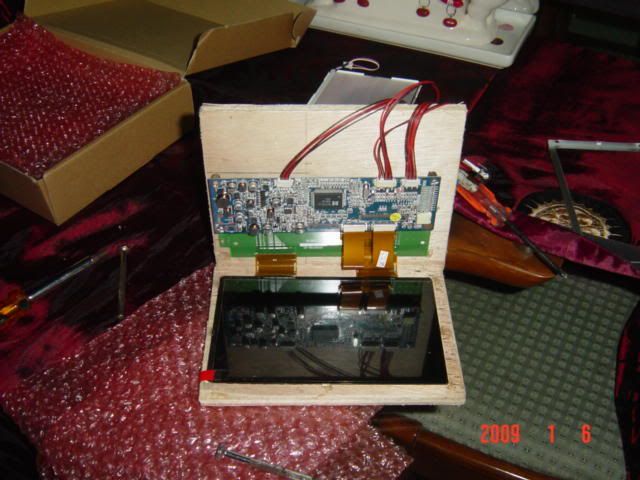
In the pics, you will see the finished frame and the lcd with still the backlight. No need for the backlighht in this project. You will need to remove the backlight and just make this as something useful say desktop lighting.
In the pics, you will see the lcd in the frame and the controller board installed in the backboard of the frame. The backboard is so much bigger so in your project just make this big enough to fit the controller baord.
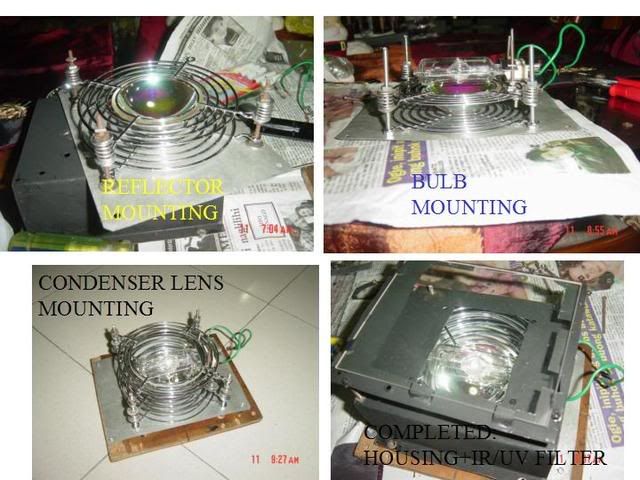
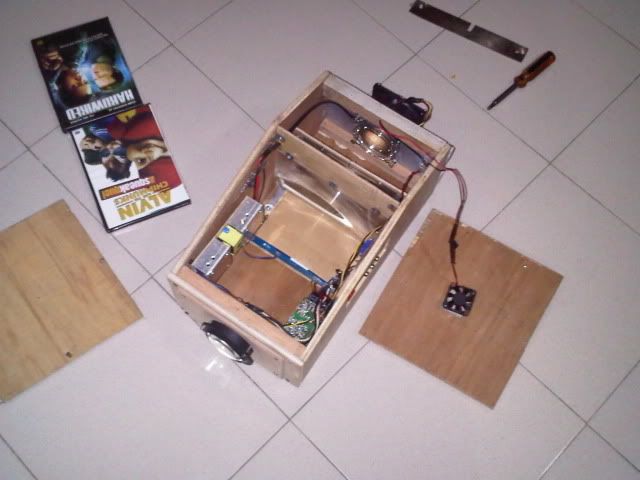
Step 3: Building the Light engine
Additional Materials needed:
Base plate: 1 pc
Fan Grills: size of the ordianry case fan
Assorted bolts and nuts.
4 springs
see pics.
a> mount the 4 -6inches long bolt in the base plate. The position of the bolt coincide with holes of the fan grills.
b> mount the reflector and put the fan grill on top. the fan grill was cut to accomodate the reflectro opening
c>put a spring on top of the 4 nuts to allow expansion of the reflector when heated
d>mount bulb base in the fan grill
e> add another fan grill to accomodate the opening of the condenser lens
f> mount the condenser lens
g> mount another fan grill to hold the condenser lens
h> put the housing or cover
e> install the IR/UV filter
All the light engine parts must be placed very close to each other except the IR/UV filter which is one inch from condenser lens.
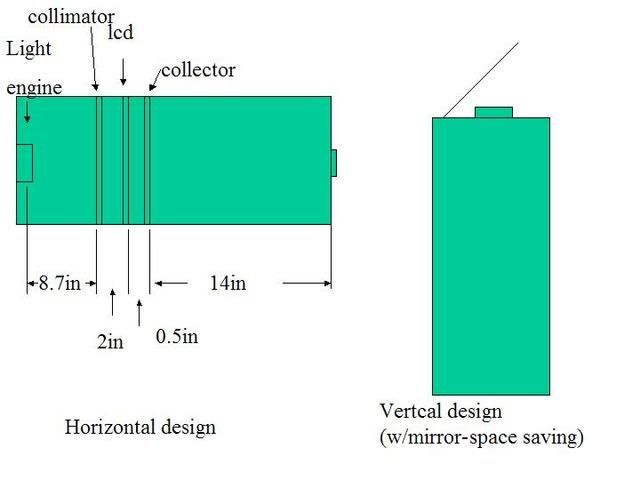
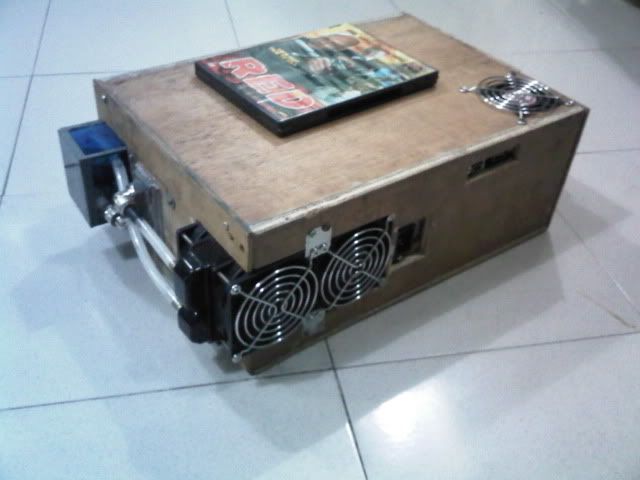
Step 4 Buiding your box
The box size depends on your design. The focal length of projection lens and collimator fresenel dictates the length of the box. the width of the box is dictated by the width of your lcd panel
Re: Build your own lcd projector
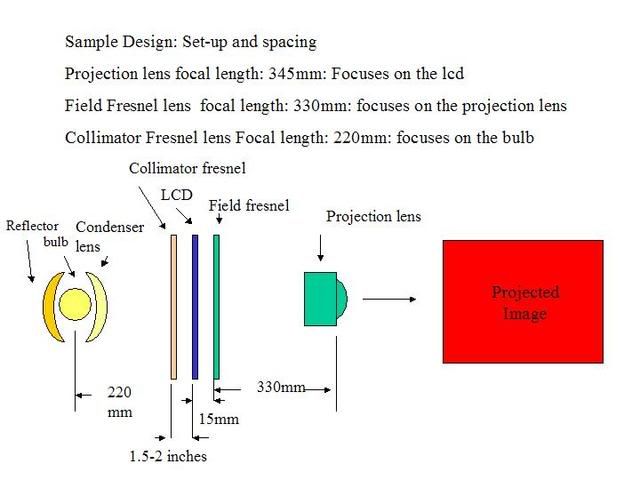
Sample design:
projection lens focal length: 345mm
Collimator fresnel: 220m
allowance
collimator fresnel to lcd: 2 inches for air circulation
Bulb to base plate: 2 inches
Most likely length of the box: 14in(345mm)+8.7(220mm)+2+2
;approx 27 inches
This is for the straight thru design. No mirror is used and the projector is in horizontal position. To save spave. a mirror is added on top and the projector will be in vertical position. This saves space.
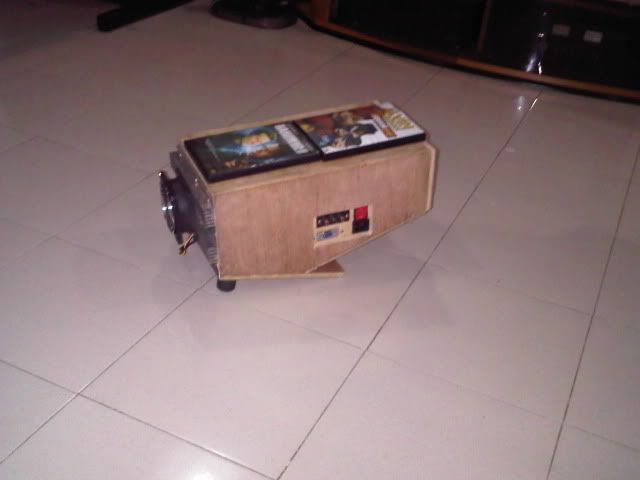
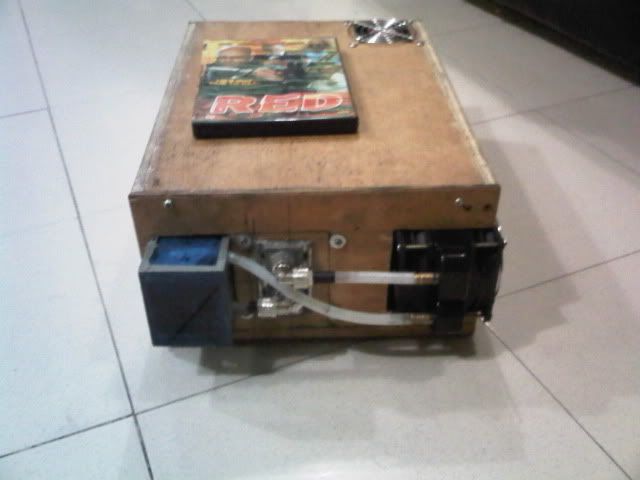
Pictures of completed projector and all parts mounted. A power supply for fans and lcd using pc power supply is intalled near the projection lens.
Fans are installed at the sides one blowing between lcd and collimator fresenl and the other sucking out the hot air inside the box located down below.
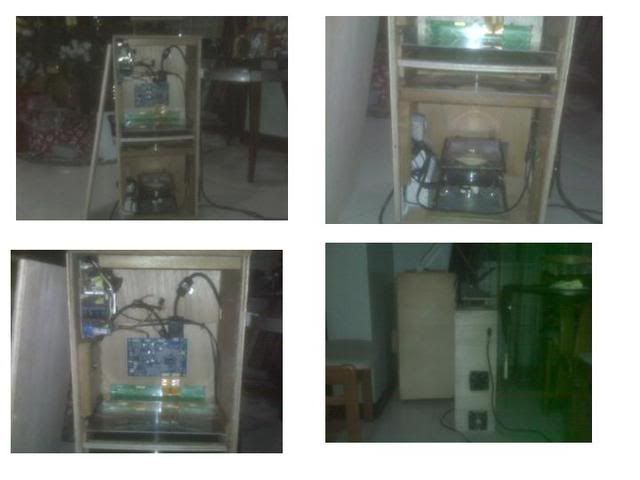
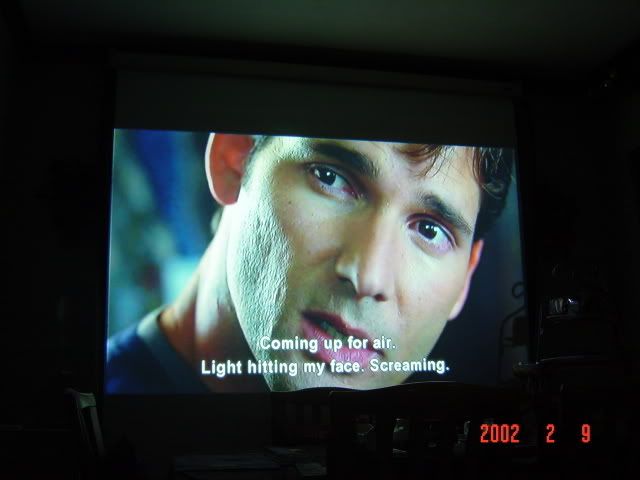
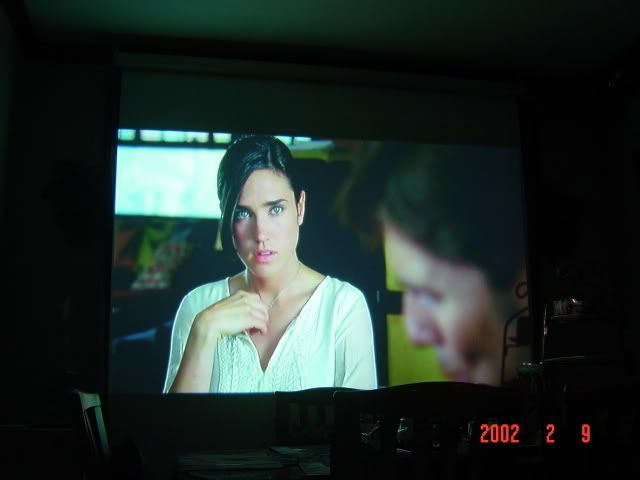
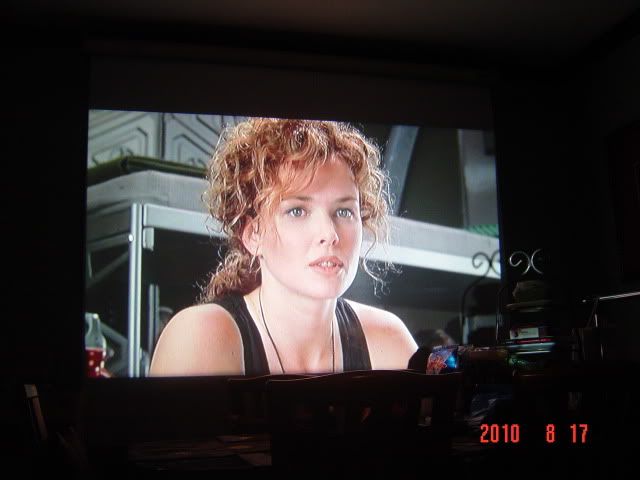
Image quality of this projector is very nice
10.2 inch lcd widescreen
800x480 resolution
response time: 25 ms
colors:262K
Sample image
New Technology - Diy Projector using LED as Light source
The same set-up applies as using metal halide bulb except that the reflector is eliminated in the set-up.
Advanatges of LED over metal halide bulb
1. 100w only. Lower electricty cost
2. Much lower temperature. Projector is cool, No noeed for intake fan.
3. instant on/off on restart
4. Projector is much lighter. No heavy ballast
5, Better brightness evenness in the projected image . Minimized hotspot.
6.Longer LCD life and fresnel life as heat is low.
7. Higher color temperature. Color saturation is better
8. Safer to operate as no bulb that can accidentally explode
9. No UV light, prolongs LCD color.
10. No reflector needed. Its one difficult part to align.
11. Overall, much easier to build. Easier to align the light engine.
Re: Build your own lcd projector
Sample image using LED 83 inches diagonal image size
Re: Build your own lcd projector
Very interesting project.
Where do you get your lenses and mirrors?
What kind of LED lamps do you use?
Can this be done with 1080p?
Does the fresnel lens degrade resolution?
Total project cost?

Re: Build your own lcd projector
five years ago i was on a hunt for the perfect DIY lcd projector but my main problem was finding the right materials. I still have that fresnel lens i took out from my old kodak slide projector...lost patience, i bought an Infocus instead.haha
but with the resolution you posted it is simply enticing! what's just bothering me is the size of your contraptions.
yes, at the current rate, what could be the total cost of the build?
lcd projectors now have become cheap since the advent of the 1080-able models..say 16K for a brand new 720p vga ported ones.
The devil will find work for idle hands to do.-Morrissey

Re: Build your own lcd projector
In my own opinion, woodworks would be a cheap and easier housing but getting an aluminum casing big enough would be more appropriate for heat dissipation and more importantly not a fire hazard.
Very interested to make one as well. I believe I have seen this one on the other forum, but still interested on this.
Re: Build your own lcd projector
Yes wood is still the chepaest and easy to work with. Its ok for led light engine because led is much much cooler. But I have used wood for bulb for several years and if you are smart, it wont be a fire hazard.
Cost depends on your creativity, but if you want all brand new parts, it can cost from 10t-18t.
major cost is the lcd quality and led lumen output. Bulb is alot cheaper. You can build at a cost lower than 10t. But LED has so many advantages.
I have limited excess parts. I source the optics form China. there is no local optics parts available. If ever you found one in Quiapo, price is unbelievable.
I used to buy retail in China but its too expensive, so I learned to source directly from manufacturer and was able to get small quanity say 10 or 20 pcs each time I need lenses.
If you are lucky, which some local diyers are, you can get lenses from surplus store. I got lucky once during 2004 when HMR is still selling used OHP projector. Only got it for 2400 pesos. I just replace the bulb and add lcd and its boom!
But as time goes on, size really matters. I want a small projector hence the redesign process which took 7 years and still on going!
I am a diyer! Its my hobby! Proud of my accomplishment. But I need to sell some parts because I will go bankrupt if I continue to do more research and buy samples to improve this project.
Currently doing 1280x800 projector using 8.9 inch lcd. Again this lcd is not locally available. the elctronics was customed made for my need. So this new project is very expensive. It even uses water cooling to cool the led. if you want cheap lcd with 720p resolution,and size dotn matter to you, then use 15 inch desktop lcd monitor which you can buy for 2500 pesos in so many sites.

Re: Build your own lcd projector
...if you are smart, it wont be a fire hazard.
No matter how smart the design or the designer is, the wood in your application is combustible so it will always be a fire hazard. If a certain system will not generate heat which may lead to something that might burn then I guess using wood will not pose a threat - this is not the case for this projector system which even need active cooling.
And if the design or the designer is smarter, that set-up could use an old desktop PC case which is lighter, stronger, more presentable, better cooling factor, easier to mod, cheaper surplus and most specially not a fire hazard.
*I am not trying to shoot down the project, I'm just clarifying the idea of what possible defeats and suggest safer alternatives.
Re: Build your own lcd projector
Sample of one diyer'r work at tipidpc. The guy is experience in water cooling. He uses water cooling for led and as far as I know, he was the first worldwide who diy a led projector using water cooling. He also uses acrylic laser cut for his box. He spend 5t pesos for his water cooling and 3t pesos for his box. He got lucky to get zoom lens at surplus store very cheap with corrrect specs..


Build also mine. I diy my own water block. Uses pump available at hardware store and bought small radiator in China. Learned alot from this guy. COst me 2t pesos for water cooling. Will redo the box to conceal the water cooling parts.
Re: Build your own lcd projector
Sample images of my 480p HDMI widescreen water cooled led projector. You tube videos convereted to dvd.


Re: Build your own lcd projector
No matter how smart the design or the designer is, the wood in your application is combustible so it will always be a fire hazard. If a certain system will not generate heat which may lead to something that might burn then I guess using wood will not pose a threat - this is not the case for this projector system which even need active cooling.
And if the design or the designer is smarter, that set-up could use an old desktop PC case which is lighter, stronger, more presentable, better cooling factor, easier to mod, cheaper surplus and most specially not a fire hazard.
*I am not trying to shoot down the project, I'm just clarifying the idea of what possible defeats and suggest safer alternatives.
Its nice to hear your viewpoint. Sorry if you find my "smart" word insulting. I dont mean it that way. I apologize.
You are perfectly correct. Many people build this project using desktop pc case. It may seem easy to mod pc case but in my case, its not. Had it considered 7 years ago.Its very difficuolt for me. But I am not stopping anyone to use their creativity. In fact I am encouraging it, I am picking out good ideas whenever I post this in different website, hopefully, some people appreciates some good points to what I am sharing.
This project will progress more, hopefully there will come a time that i can fullly design everything up to the last details even the size of the screw or nuts. Then have the aluminum box fabricated in china for final design. Its a passion for me. I am thinking , same is what other people is wildly thinking, that hopefully, building of projector is like building a pc where you put the parts inside the box and there you go!
if you are new to these things, Its very good to take extra precautions when using bulb. Use aluminum/GI sheet if you are using bulb if you are comfortable using aluminum/Gi sheet. Use of wood is always the start. Because its easy to do . Securing the light engine with metal sheets is done to prevent burning of wood. Its always been my direction to use aluminum because its cheap and very light but the final casing design seems to be a never ending process.
When you are using led, you dont have to worry much. You can touch it even when its running. Its mounted in an aluminum heatsink.
Its one of the greatest advantage of using led over bulb. heat dissipation is very low and of course power consumption.
I am now in the directions of altogether forgetiing the use of bulb.
There seem to have a negative connotation in the use of active cooling for LED . Having thought maybe that its burning hot? Led operating temperature in this design is less than 40 degC ( like running high fever). The reason why we are doing active cooling is to extract as much lumens from it. Led has this characteristic of reduce brightness when temperature is high. SO we use active cooling. It is still cheaper than buying high wattage led and operating at high temp with reduce brightness.
These led is thermally protected now . In case cooling fails, it shutsdown. I had spend consirable time researching on simplest electronic circuit that I can find that is small enough to fit inside the crowded box. And to my surprise, with a lot patience found a single component thermal protection that is even small enough to fit inside my nose and cost so much less.
Active cooling maybe new to alot of people. I dont know much since 2 months ago. I only learned from one guy who unselfishly shared his experiences. I did start from there now I can even recommend to anybody how to do water cooling at the cheapest cost. Water cooling set-up cost more than 5t pesos. Now I am nearing the process of sharing to you how to spend 1500 pesos for water cooling. You can use it for pc also.
I learned alot technically in the use of led. Driver circuit design even hampers the development of this project, but then again with a little help from friends and diyers, I had already shared it and made available the circuit and can done easily with the fewest components possible.
And the most ciritcal part is the led design itself. Happy to find supplier in China who is also a diyer. He helped me manufacture a led arrangment according to my design. So the led design we are using now is not commercially available.
The final case design is my ultimate goal. But I am always overtaken by new developments because this is just a hobby of mine and still employed professionallly. Resources is needed to further improve and this is the sickest part.
Re: Build your own lcd projector
Nice to know your doing your besft effort to make it safe, at least the newbies might not misunderstand us. I still love the idea, but as you've said it would still demand much research for those who would like to try.
What are the consumables in an LED setup? How much would the it take to maintain it, as I know that bulbs cost an arm and a leg.
Re: Build your own lcd projector
Cheapest bulb cost 1000 pesos. I am using generic HSD bulb with 5mm arc length .2000 hours. Original HSD bulb cost 7000 pesos. Commercial projector uses bulb with arc length of 1mm which makes them very expensive.
For projection system short arc bulb is recommended. CDR king uses double ended metal halide bulb with 1 inch arc length and you can buy this bulb at hardware store for 500 pesos but this is inefficient, I started using this double ended metal halide bulb long ago and chemicals inside the bulb is prone to deposit inside the inner envelope causing it to dim in a short time.
But as I said, i am moving away from using bulb.
Led will save you alot of money in terms of electric bills. And less worry on its life., Advertise hours is 50,000 to 100,000 hours. Initial cost though is high. Led prices ranges from 3000-6000 pesos depending on lumen output and wattage. And its Cool! We are abreast with new technology. Pogi points for builders!
Research is for further inprovement. Present set-up pruduces very good images ( at times excellent depending on source video) for people new to big screen to enjoy alot. I am previous owner of Infocus X1
but disposes it after reaching its 1000 hours life. Worrying alot on bulb, color wheel, board and electronic ballast life. ( electronic ballast has limited life also in case you want to know) . manufacturers change models one after another and if the unit broke, spare parts are hard to find and may cost you the cost of projector just for repair.
With diyprojector, you can leave it on during parties and karaoke without worrying too much because its cheap, low power cost and in cas eof breakdopwn,you know how to repair it since you build it.
It can be upgraded say better lcd or if new light engine will be develop in years to come.
Maintenance is minimal. Need to clean maybe a bout every 6 months but since you build it, its not a problem . It will only taker a few minutes to remove the dust inside.
Looks easy for people with diy experience in electronic projects or with electronic engineering background.
But if you are not a technical person, this project will look so hard to do.
Surprisingly, this is funny, majority of builders are those who work at call centers! followed by engneering students. Most have no technical background but with very strong confidence to bulid diy projects.
And again, its a challenge, even ladies had done this. They have the box made by carpenters and they themselves install all the parts inside box, but they are electronics engineering students. they designed the electronic protection circuit and power source .
Re: Build your own lcd projector
[HTML]Surprisingly, this is funny, majority of builders are those who work at call centers![/HTML]
include us...hehe..my colleague in the lab is very much interested in building one since five years ago had it not been for the busy work we have each day.
that 15-20K budget for the DIY lcd proj is still expensive to me to compare it to the commercial ones..but what interests me is the lamp hours of the new led technology.
my Infocus24 is rarely used, now on its 250th lamp hour, purchased 5 years ago.
The devil will find work for idle hands to do.-Morrissey


