


Re: Let's practice STICK WELDING, and proper weld bead applications.
WHAT IS A FILLET WELD ??
A Fillet weld is the most common type of weld. It is used to join two pieces of flat plate steel at a 90 degree angle. A Fillet weld overhead position is produced by running a weld bead at 45 degree angle to a 90 degree corner. It resembles a triangle when viewed from the side. Fillet weld is the most basic of welds, it is used to make lap joints, corner joints, corner joints and T joints. Sourced from WiseGeek.
Here are some line drawing illustrations too for better understanding and visualizations.
: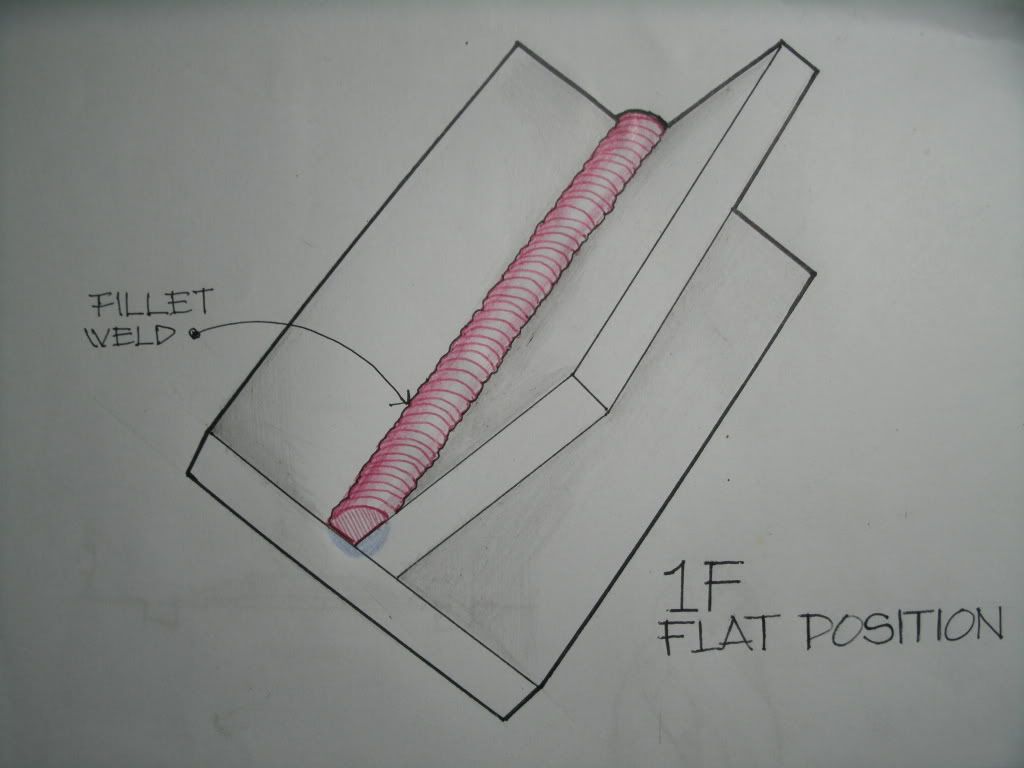
1 F, Flat Position
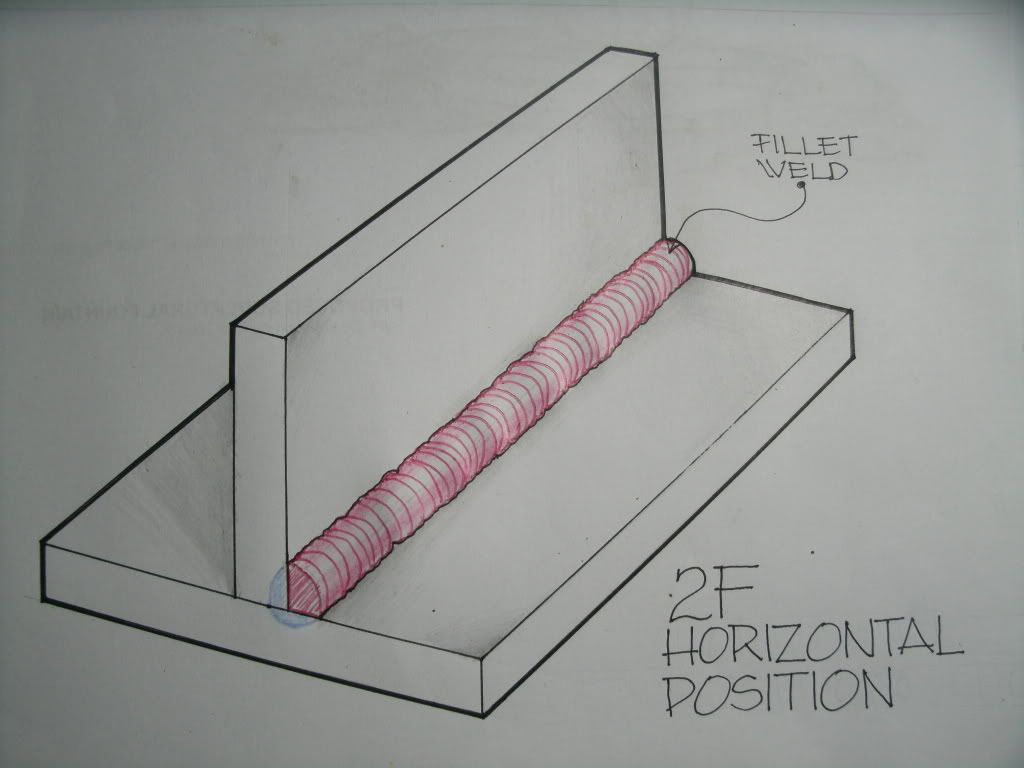
2 F, Horizontal Position

3 F, Vertical Position
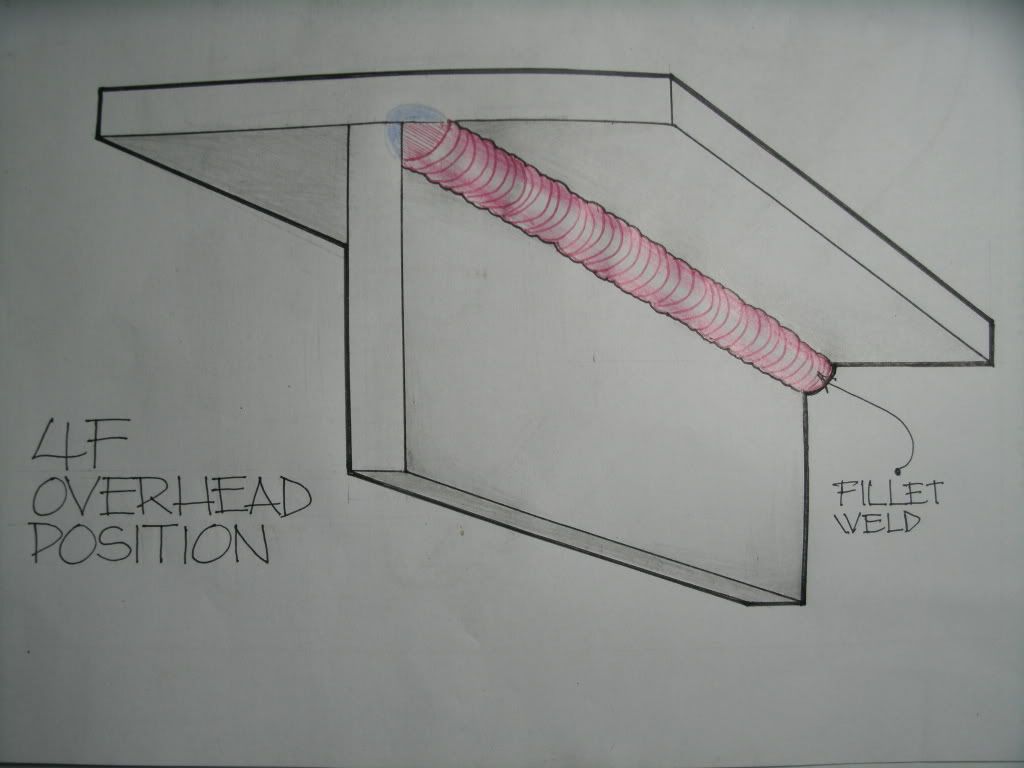
4 F, Overhead Position
CIGWELD Weldskill 250 amp Mig Welder
AHP Alpha-TIG 200X welder
HITRONIC 300 Amp DC Inverter IGBT Welder
YAMATO 300 amp AC Stick Welder
YAMATO 200 amp DC Inverter IGBT Welder
DeWALT Chopsaw
HOBART and ESAB Welding Helmets
cloned STIHLs
MS 044 chainsaw
MS 070 chainsaw
Re: Let's practice STICK WELDING, and proper weld bead applications.
http://www.millerwelds.com/resources/TIGhandbook/
http://www.millerwelds.com/resources
I came across this site. Very informative. Lots of learning materials.
Re: Let's practice STICK WELDING, and proper weld bead applications.
YES, these links you posted will surely be a good source of information and learning. :cool01:
Thanks bro vrcinfo:thanks: for sharing !!!!!!!!
CIGWELD Weldskill 250 amp Mig Welder
AHP Alpha-TIG 200X welder
HITRONIC 300 Amp DC Inverter IGBT Welder
YAMATO 300 amp AC Stick Welder
YAMATO 200 amp DC Inverter IGBT Welder
DeWALT Chopsaw
HOBART and ESAB Welding Helmets
cloned STIHLs
MS 044 chainsaw
MS 070 chainsaw
Re: Let's practice STICK WELDING, and proper weld bead applications.
I would like to share this YouTube video link, I know lots of newbies in Stick Welding or MMA or SMAW will benefit from this and will hopefully understand more easily the whole process of welding compared to just seeing stills or pics. 😉
Hope you guys will give it sometime to watch, study and enjoy learning of this tutorial in motions. :fetch1:
http://www.youtube.com/watch?v=zWdgEaXWDxQ&feature=related
CIGWELD Weldskill 250 amp Mig Welder
AHP Alpha-TIG 200X welder
HITRONIC 300 Amp DC Inverter IGBT Welder
YAMATO 300 amp AC Stick Welder
YAMATO 200 amp DC Inverter IGBT Welder
DeWALT Chopsaw
HOBART and ESAB Welding Helmets
cloned STIHLs
MS 044 chainsaw
MS 070 chainsaw
Re: Let's practice STICK WELDING, and proper weld bead applications.
Very informative video, bro rosy!
Now I understand what caused my mistakes during my first metal project.
Re: Let's practice STICK WELDING, and proper weld bead applications.
Glad to know you gave it sometime to watch and perhaps learn something from it, I myself love watching it just to remind me of probably some mistakes that I am making, hope others will watch this video too.
CIGWELD Weldskill 250 amp Mig Welder
AHP Alpha-TIG 200X welder
HITRONIC 300 Amp DC Inverter IGBT Welder
YAMATO 300 amp AC Stick Welder
YAMATO 200 amp DC Inverter IGBT Welder
DeWALT Chopsaw
HOBART and ESAB Welding Helmets
cloned STIHLs
MS 044 chainsaw
MS 070 chainsaw
Re: Let's practice STICK WELDING, and proper weld bead applications.
Here are some few pics where I applied some welds on a very simple metal project, an improvised digging tool bar.


Here I used two kinds of welding electrodes, E6013 and E7024. I first used the E6013 to weld the GI pipe and the 1/4" thick metal plate, purpose was to thicken the surface of the GI pipe so that when I applied the E7024 rod, I will not get some burn through/or melt the pipe since it is thinner than the metal plate.
CIGWELD Weldskill 250 amp Mig Welder
AHP Alpha-TIG 200X welder
HITRONIC 300 Amp DC Inverter IGBT Welder
YAMATO 300 amp AC Stick Welder
YAMATO 200 amp DC Inverter IGBT Welder
DeWALT Chopsaw
HOBART and ESAB Welding Helmets
cloned STIHLs
MS 044 chainsaw
MS 070 chainsaw
Re: Let's practice STICK WELDING, and proper weld bead applications.
Getting a RED warning light from the YAMATO DC Inverter :
I learned something awhile back while burning some welding electrode on some practice plates. I got my first warning[COLOR="Red"] RED Light from the YAMATO welder.
Well this morning I started working on the existing 2.00 M provided by the welder. I find the 2.00 M short for my needs so I salvaged the cable wires of my locally made welder since I don't use it anymore, then started removing/detaching the existing electrode holder, ground clamp and the copper flat washer after which I connected them each to the existing welding cables of the YAMATO welder.
Now I have a 5 meters total length of ground cable, and for the lead electrode cable, I have a total length of 8 meters, compared to the 2.00 M only. Now I can weld further away from the YAMATO or won't be lugging it always beside me when the need arises like welding at a certain height or overhead. :superhero:
How did I get that warning RED light ?, well right after lunch I tested the welder and see if the cables where properly attached/connected, everything went well on the connections. The RED light warning came in after burning continuously some E6011, E7018 and E7024 on some practice plates. So I learned, when the warning light lits up, the welding electrode doesn't fire up, you just have to let it run ( the fan ) for a five minutes or so then turn off the welder and wait for about 10 to 15 minutes before starting again to weld. :rolleyes:
So sorry no pics to record every thing, how I wish I had the camera and taken some pics but of course I did not think it was needed then 'coz I was just adding some lengths on the existing cables.
Anyway, I used different settings for the three types of rods used, 140 and 160 amps and it did delivered decent weld puddles but don't expect "beautiful welds" using the E6011, with the E7018 rods, it was quite OK, but with the E7024 rods, I like this rod better, drag it or do some weaving, you get the same uniform weld puddles and the slags would dislodge by itself or leaving a little effort chipping the slags.
Well that's it, I got my first RED Warning light and hope you get something from this experience. :jump:
CIGWELD Weldskill 250 amp Mig Welder
AHP Alpha-TIG 200X welder
HITRONIC 300 Amp DC Inverter IGBT Welder
YAMATO 300 amp AC Stick Welder
YAMATO 200 amp DC Inverter IGBT Welder
DeWALT Chopsaw
HOBART and ESAB Welding Helmets
cloned STIHLs
MS 044 chainsaw
MS 070 chainsaw

Re: Let's practice STICK WELDING, and proper weld bead applications.
Sir rosy how long did you continuously weld before the light lits up?
Re: Let's practice STICK WELDING, and proper weld bead applications.
HI bugel,
I cannot say but I was burning rods one after the other with a little pause to chip off the slags and then again attacking the practice plate and when I was about to start with the 4th welding rod it did not fire off anymore. I prepared 2 rods each of 6011, 7018 and 7024 and using different ampere settings of 140 and 160. I thought there was some connection problem with the ground clamp but when I glanced upon the welder, I saw the red light so I figured out its giving out a warning to rest the welder. :rolleyes:
I suppose this is about the Duty cycle that this welder can operate. Meaning with 60% Duty cycle, in a span of 10 minute of operation, 2 or 3 minutes of continuous welding, then the welder must cool for seven or eight minutes to prevent overheating since this is only a 200 amps DC welder.
It reminded me that the technician from Mimi's warehouse told us before during our group buy of the welder that yes we can do welding continuously but by the 3rd or 4th rod used, the RED Light warning will appear, so by that time the machine have to be rested or cooled down so not to overheat the machine. :dance1: 🙁
Nakuha mo bro Bugel !
CIGWELD Weldskill 250 amp Mig Welder
AHP Alpha-TIG 200X welder
HITRONIC 300 Amp DC Inverter IGBT Welder
YAMATO 300 amp AC Stick Welder
YAMATO 200 amp DC Inverter IGBT Welder
DeWALT Chopsaw
HOBART and ESAB Welding Helmets
cloned STIHLs
MS 044 chainsaw
MS 070 chainsaw
Re: Let's practice STICK WELDING, and proper weld bead applications.
ah..i see..good thing is were pretty sure na gumagana nga yung thermal protection nya.
Re: Let's practice STICK WELDING, and proper weld bead applications.
HEHEHE, I suppose when using your Yamato Inverter, you glance at your welder ones in a while just to check if the red warning light is lighting up.
Enjoy using your Yamato bro !! 😉 :p
CIGWELD Weldskill 250 amp Mig Welder
AHP Alpha-TIG 200X welder
HITRONIC 300 Amp DC Inverter IGBT Welder
YAMATO 300 amp AC Stick Welder
YAMATO 200 amp DC Inverter IGBT Welder
DeWALT Chopsaw
HOBART and ESAB Welding Helmets
cloned STIHLs
MS 044 chainsaw
MS 070 chainsaw
Re: Let's practice STICK WELDING, and proper weld bead applications.
Getting a RED warning light from the YAMATO DC Inverter :
I learned something awhile back while burning some welding electrode on some practice plates. I got my first warning[COLOR="Red"] RED Light from the YAMATO welder.
Well this morning I started working on the existing 2.00 M provided by the welder. I find the 2.00 M short for my needs so I salvaged the cable wires of my locally made welder since I don't use it anymore, then started removing/detaching the existing electrode holder, ground clamp and the copper flat washer after which I connected them each to the existing welding cables of the YAMATO welder.
Now I have a 5 meters total length of ground cable, and for the lead electrode cable, I have a total length of 8 meters, compared to the 2.00 M only. Now I can weld further away from the YAMATO or won't be lugging it always beside me when the need arises like welding at a certain height or overhead. :superhero:
How did I get that warning RED light ?, well right after lunch I tested the welder and see if the cables where properly attached/connected, everything went well on the connections. The RED light warning came in after burning continuously some E6011, E7018 and E7024 on some practice plates. So I learned, when the warning light lits up, the welding electrode doesn't fire up, you just have to let it run ( the fan ) for a five minutes or so then turn off the welder and wait for about 10 to 15 minutes before starting again to weld. :rolleyes:
So sorry no pics to record every thing, how I wish I had the camera and taken some pics but of course I did not think it was needed then 'coz I was just adding some lengths on the existing cables.
Anyway, I used different settings for the three types of rods used, 140 and 160 amps and it did delivered decent weld puddles but don't expect "beautiful welds" using the E6011, with the E7018 rods, it was quite OK, but with the E7024 rods, I like this rod better, drag it or do some weaving, you get the same uniform weld puddles and the slags would dislodge by itself or leaving a little effort chipping the slags.
Well that's it, I got my first RED Warning light and hope you get something from this experience. :jump:
Hey Brader. Sorry. Just seen this message just now.
I am experiencing this red "OC" light once in a while. I just turn the welder off for a few secs until the fan and or the the indicator goes off. Wait about 10 secs, then On again.
No pattern was observed, so I can't isolate the exact cause. I am not welding continuously as well. Have used 6011,13,19 and 7024. Even on low current 3/32 6013.
fyi
Re: Let's practice STICK WELDING, and proper weld bead applications.
Hey bro Ariel (av973),
Let your welder rest for 5 minute or more to cool down the machine instead of just 10 or so seconds before starting again. Lets be concern also not to abuse the small welder, knock on wood that it doesn't bogged down on you or anybody else who acquires this Yamato DC Inverter.
Really its gonna be a lot of hassle if anything goes wrong with the welder specially in the middle of a metal project and if that is the only welder you've got in the shop. 😮
Anyway bro, enjoy welding and stay safe always !! :banana2: 😀
CIGWELD Weldskill 250 amp Mig Welder
AHP Alpha-TIG 200X welder
HITRONIC 300 Amp DC Inverter IGBT Welder
YAMATO 300 amp AC Stick Welder
YAMATO 200 amp DC Inverter IGBT Welder
DeWALT Chopsaw
HOBART and ESAB Welding Helmets
cloned STIHLs
MS 044 chainsaw
MS 070 chainsaw
Re: Let's practice STICK WELDING, and proper weld bead applications.
Hey bro Ariel (av973),
Let your welder rest for 5 minute or more to cool down the machine instead of just 10 or so seconds before starting again. Lets be concern also not to abuse the small welder, knock on wood that it doesn't bogged down on you or anybody else who acquires this Yamato DC Inverter.
Really its gonna be a lot of hassle if anything goes wrong with the welder specially in the middle of a metal project and if that is the only welder you've got in the shop. 😮
Anyway bro, enjoy welding and stay safe always !! :banana2: 😀
Hu-hu-hu-hu!


