This is my workbench build. I call this the Trestle Workbench with Torsion Box table top. The style is quite odd as the trestle thing is kinda old and seldom used. But i like the design and very appropriate for the wood materials that have been lying around in my shop for almost 2 years. Why the Torsion Box table top? Aside from the budget constraints, i can still use the marine plywood of my current workbench plus the leftover plywood from the entertainment center i built last december. Despite the plan to make it a low cost WB, it already costed me almost 7k including the vises.
Here's the WIPs:
Day 1: Feb 11 - the Sketchup plan of the Trestle.

the CorelDraw plan of the torsion box.

The pinewoods that came with the Kodak digital presses from the US.

.
Re: Armand's Workbench
Day 2: Feb 12 - Started milling the stock.


.
Re: Armand's Workbench
Day 3: Feb 13 - The milled woods with the angled cuts.

at the background is my current multi purpose workbench..i used to consider it as very tough until I came into real woodworking. It produced a lot of projects and fun for the kids...we tweaked a printer, revived a number of dead electric funs and a couple of washing machines..made water-bottle rockets and a diy water filter for our 50 gals aquarium..and once served as my table tennis in the garage by putting a whole sheet of plywood on top.
Re: Armand's Workbench
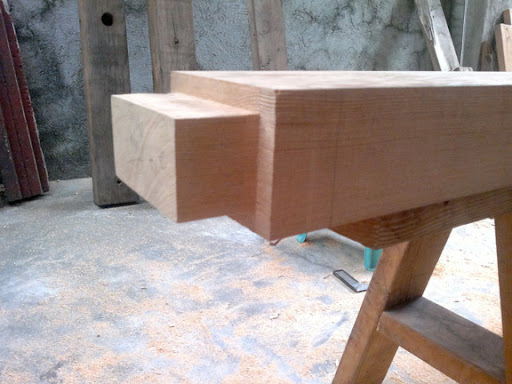
Day 4: Feb 19 - The biggest Mortise and Tenon i've ever made. Took me the whole day for the m/t alone.


Re: Armand's Workbench
Day 5: Feb 20 - Assembly time.


.
Re: Armand's Workbench
Day 6: Feb 27 - working on the torsion box.

Re: Armand's Workbench
Day 7: Feb 28 - Final assembly.
the glued torsion box.

the bottom plywood is from my old wb, the top is a new one. Total thickness is now 3 1/4".
now edgebanded with 3 layers of 2x4 at the front and 1 each at the remaining sides.

Vises were likewise installed later that day. Here the tail vise is shown without a jaw yet. I plan to put a benchdog on it coz i don't like having an opening on top of my workbench. A rail guide is also necessary to keep the jaw on its upright position.
Re: Armand's Workbench
additional wips for the tail vise:

before adding the 3rd 2x4 at the front, i made an undercut where the steel screw will run.
and added a small support block:

the front vise:

Re: Armand's Workbench
some tissue paper I produced 😉

Re: Armand's Workbench
and the semi-completed trestle workbench, its very very heavy..i had to call my two sons to help flip the top after installing the vises. I can just leave the table top without it bolted on the the frames.
shown here without the benchdog holes and the wooden jaw for the front vise. (still waiting for the hardwoods from batangas)
Dimensions: Height 34" inch, (my old one is 32")
Torsion Box table top is 30" x 60"


...til then
.
Re: Armand's Workbench
I'm sure it will really look Great when finishing is done. 🙂
Millermatic 180 Autoset Mig Welder
Miller Spoolmate 100 Spool Gun
Victor Firepower 350 Oxy Ace Outfit
3M Speedglas 9002X AD Helmet
Makita LC1230 Dry Cut Saw
Ingersoll Rand Air Tools
Snap On Tools
Metabo Power Tools
Norseman Drill Cutting Tools
Bosch Power Tools
3M PPS
Re: Armand's Workbench
Another great workbench in the making. Thanks for sharing Armand!
Re: Armand's Workbench
Very elegant work Bench.
Re: Armand's Workbench
very very nice Armand, congrats, looking forward to your ail vise construction.
I must say to those wanting to build a workbench, you MUST have a good handplane and some airtime with it, otherwise a workbench is just impossible... nice shavings as well...

click my signature and it will take you there........
Re: Armand's Workbench
Fit for living room more than a workshop.
How are you attaching the torsion box top to the trestle? Thru-bolts? Or wood screws from underneath?


