I excerpted my next 2 paragraphs here from my profile intro in the Newbie section.
--- start of excerpt
My last tool purchase was last Monday (March 3). It's a used Ryobi 10" table saw [ETS-1526AL]. Very cheap, because it lacks the following parts:
blade guard assembly (including riving knife) [part# 089110507710);
table insert pack [part# 089110507600)
miter gauge assembly [part# 089110507800];
rip fence assembly [part# 089110507804];
legs [part# 089110507770]
I wish I could contact ryobispares.co.uk, but there is no contact details in their website. They have detailed parts list with corresponding price (in pounds). While I can't establish contact with them yet, I will try to make patterns of the lacking items. I've read some topics regarding this table saw. I hope, I would have a chance to visit one of the owners of this model, who may allow me to have a look (or take pictures). Better yet, if they are not using it any more (by any chance) sell the parts I needed [at surplus cost?].
--- end of excerpt
I told myself that I will not use this unit until I thoroughly read its manual and get a resolve on its safety issues because of the lacking protection parts.
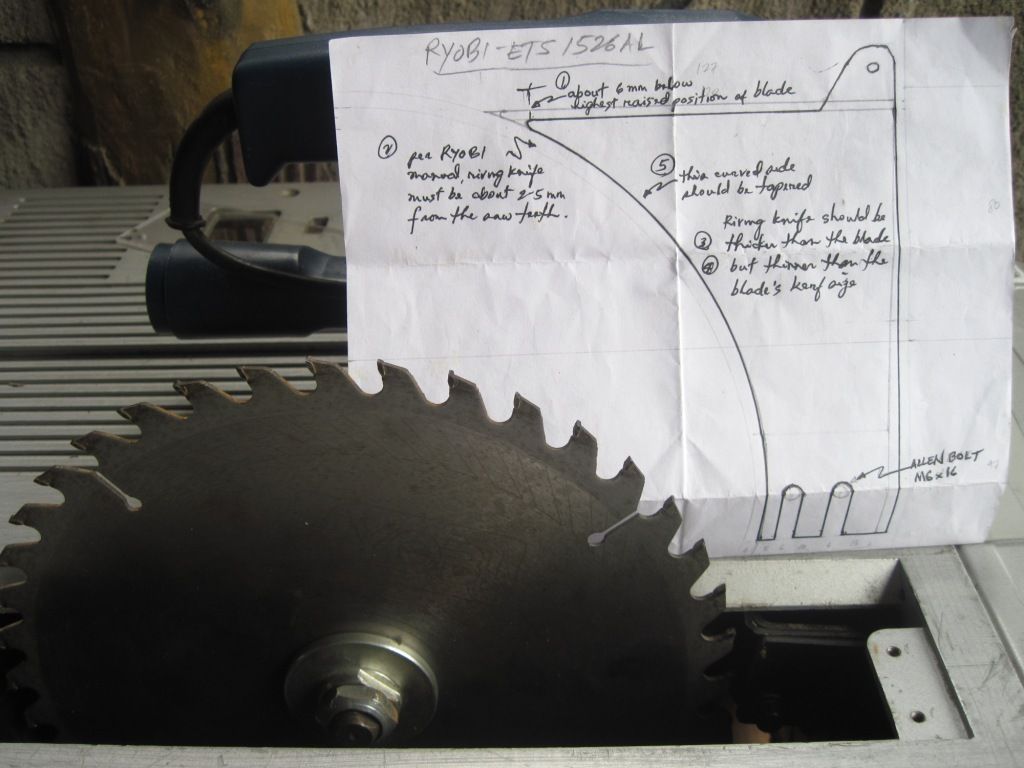
Based on safety articles, for table saw, riving knife [and its blade guard] is your best "armor" against kickback. Unlike a fixed splitter [which they say, some can even go with the blade's bevel movement], RK can go with the lowering and raising of blade. I made a draft drawing of the riving knife based on the following mechanics (see photo and notes):
1) at least 1/4" (6mm) lower than the highest raised position of the blade's tip
2) about 2-5mm away from the blade
3) slightly thicker than the blade's width [Ryobi blades's width = 2mm]
4) slightly thinner than the blade's kerf [Ryobi blade's kerf = 3mm]
5) sides tapered on the portion near the blade
The seller gave me a riving knife for a 10" blade (but for another brand). The item is marked and says it's width is 2mm. And it is tapered on its curved side. But I will have to modify its shape to conform with the other mechanics as stated above and the draft design I made. In case this doesn't work out fine, my other option for the type of materials are: aluminum, PVC sheet or hardwood. As I understand, I may also need to make another RK assuming I'm going
to use blade with different width.
I've already bought a clear 3/16" acrylic plastic intended for fabricating a blade guard. But when I tried to make pattern using 1/8" of that plastic, I found out that it is brittle. Not good as "armor". I will try to look for a LEXICAN, instead? (is this a brand name of a plexiglass?). For better fabrication, mas mainam yata if I can see the actual guard for this model?
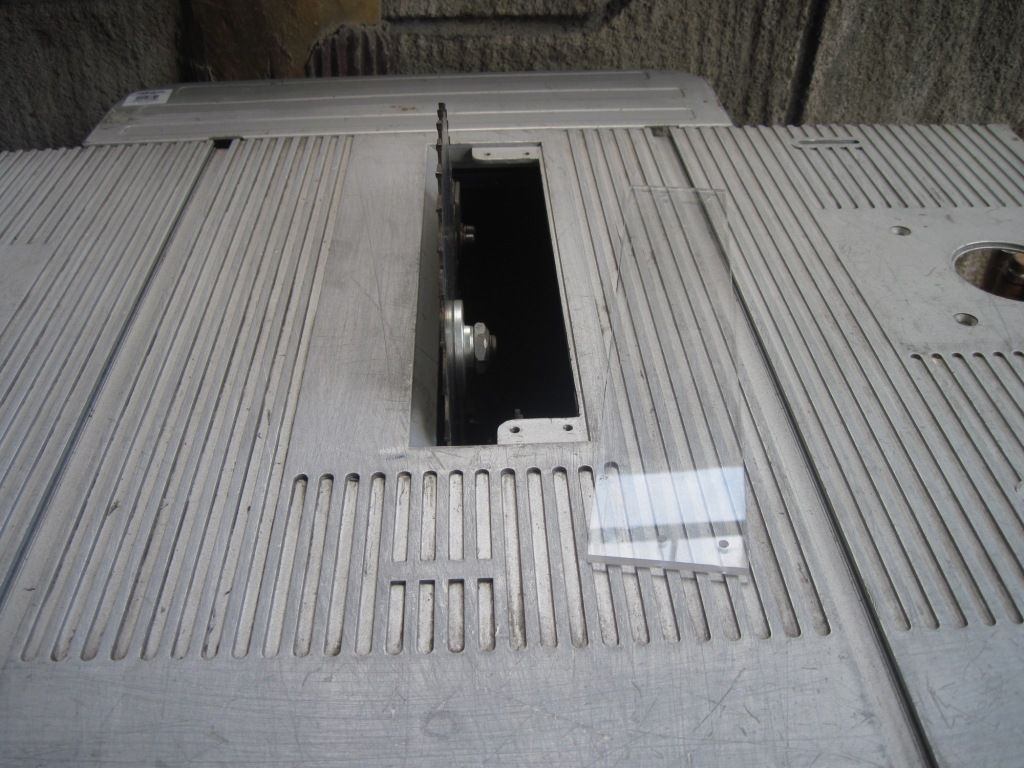
Another safety item is the table insert
It's thickness is 3mm. At 90 deg, fully raised, I measured the blade's left clearance, 5mm. The open, right side (where the missing insert should be), is 56.5mm from the blade . Making same clearance (5mm) on its right side at 90 deg, will result into a 13mm clearance when bevelled at 45 deg. If I make a 5 degree clearance with blade at 45 deg bevel, the insert will obstruct (touch) the spindle washer. The best clearance compromise maybe, is 2-3mm at 90 deg, resulting to about 9-10mm clearance at 45 deg; plus make a 45 deg undercut (taper, under part only of the insert) in the insert at its long side near the blade. So, the insert width will be about 53.5-54.5mm. From the parts list (#089110507034), I'll need 4 pcs of cross head sank screw, M4x8. Like the RK, type of materials option may be: aluminum, PVC sheet or hardwood.
Another problem with unit is when blade is almost or fully lowered
[IMG][URL= http://s1057.photobucket.com/user/edil-jr/media/PinoyHandyMan/loweredsawblade- notemis-alignment_zpsad60e680.jpg.html] [/URL][/IMG]
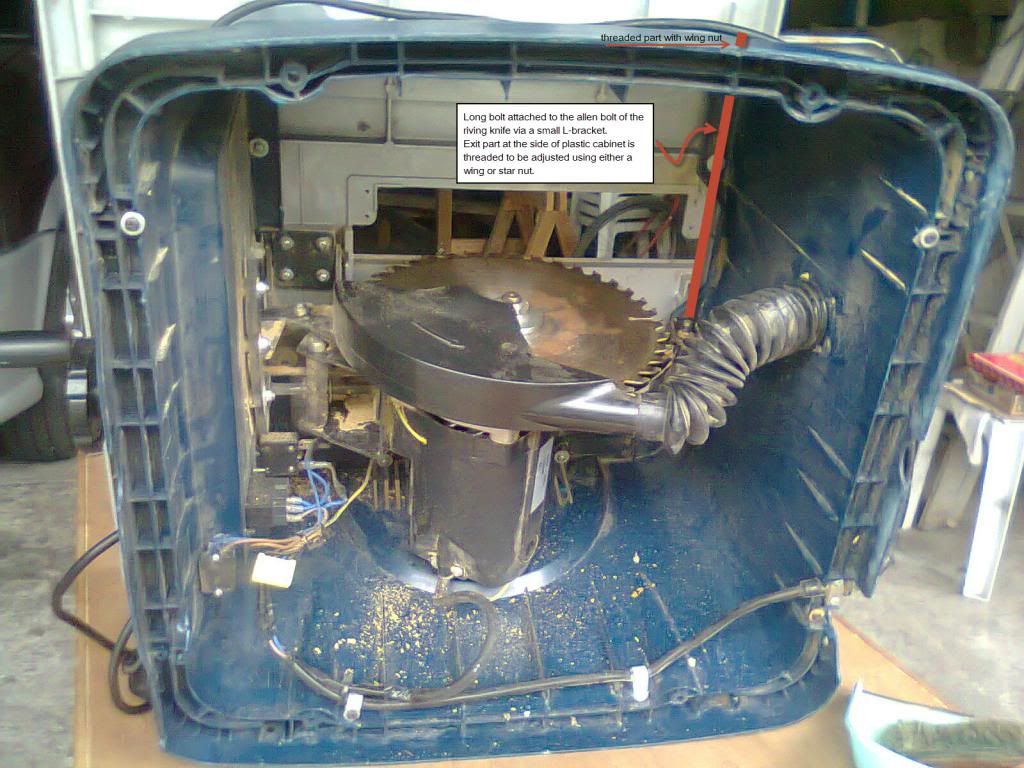
left side clearances are as follows: 2mm at the back-end and 3mm at front-end. Although, when raised at its highest, both back and front-ends are 5mm, there will be some mis-alignment as you lower the blade. My take on this... I will attach a bolt with a small L-shape bracket perpendicular to the back part of the blade underguard (where the RK is bolted.This bolt will have to exit on that side of the plastic cabinet, so I can add an adjusting knot [wing or star type].
Have anyone experienced this? If so, is there an easier work-around?...
Rip fence / miter gauge assemblies and legs may be fabricated later (assuming there are no stocks available).
There goes the table saw story...
Comments or suggestions will be greatly appreciated.
Re: ETS-1526AL -Fabrication of lacking safety mechanisms
Hi, before you consider making those parts i suggest you troubleshoot the misalignment fault. This maybe caused by a hairline crack on a bracket or a loose bolt/nut. Mukhang hinihila ng rise/fall mechanism towards it. That unit might be a returned item due the fault tapos kinahuyan ng pyesa.
Posted via PHM Mobile
Re: ETS-1526AL -Fabrication of lacking safety mechanisms
My old Ryobi saw was useful for me for a few months . Then, it had a misalignment problem as well. The trunion has no user-friendly adjustment. I figured I will spend too much time trying to fix the saw, time I should otherwise be devoting doing projects, so I gave up and upgraded. But right before I sold it, it died.
I hope you find an easy way to do the fix.
Re: ETS-1526AL -Fabrication of lacking safety mechanisms
thanks 22y !
Yesterday, as I am trying to resolve the mis-alignment, I found out that when I attempted to move the riving knife bracket (where I'm supposed to put the adjusting bolt), the blade is not moving at all. So, I kept on trying to see if which part could possibly give resolve, until saw the damaged angle bracket [see 2 photos]:
1) adjusting gear at the extreme right (90 degree position); gear almost has no hold.
[IMG]  [/IMG]
2) at about 30 degree position, notice 3rd tooth complete gone while 1st, 2nd and 4th teeth also partially broken.
[IMG]  [/IMG]
Two options: a) fabricate the angle bracket or b) buy angle bracket- part# 089110507103
which is about 1.11 pounds (about PhP 83.00)... seller/donor, anyone?
Re: ETS-1526AL -Fabrication of lacking safety mechanisms
switched caption. 1st photo is at 30 deg position and 2nd photo is at 90 deg position.
--- sorry po.:(
Re: ETS-1526AL -Fabrication of lacking safety mechanisms
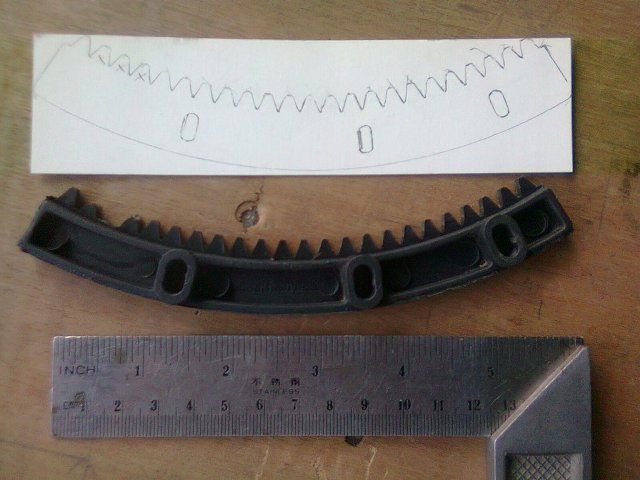
In the effort to resolve the blade mis-alignment, I was able to remove the angle bracket yesterday. And traced it into a white cardboard. The photo shows the internal portion of the bracket (the portion that faces the inside wall of the plastic cabinet). Also, note that the traced image already has the corrected 2nd to 4th teeth.

If I can't buy a replacement, I intend to look for a way to just replace the broken teeth (as in dental "crowning"). The angle bracket is made from either hard rubber or plastic and the matching gear must have been the same. If the material replacement is harder than the rubber/plastic gear, will the gear wear-out faster? Comments/suggestions, please?
Re: ETS-1526AL -Fabrication of lacking safety mechanisms
If you're out of better options probably you can try JB Weld 8267-S SteelStik Epoxy Putty Stick to form the part then file it to shape.
Millermatic 180 Autoset Mig Welder
Miller Spoolmate 100 Spool Gun
Victor Firepower 350 Oxy Ace Outfit
3M Speedglas 9002X AD Helmet
Makita LC1230 Dry Cut Saw
Ingersoll Rand Air Tools
Snap On Tools
Metabo Power Tools
Norseman Drill Cutting Tools
Bosch Power Tools
3M PPS
Re: ETS-1526AL -Fabrication of lacking safety mechanisms
If you're out of better options probably you can try JB Weld 8267-S SteelStik Epoxy Putty Stick to form the part then file it to shape.
Sorry, Jay. I think JBWeld is a great product, which is why I have a number of tubes I got from you. And still a happy user. But I'm not sure if it will stick to plastic. Reason I say this is that I work with a lot of epoxy on my boat and epoxy does not stick to many types of plastic (not all though). I actually use plastic sheets to mask out areas of my work where I do not want epoxy to drip into.
Perhaps, though, Pandai can use JBWeld to shape the teeth, as you suggested, then glue them into the plastic using super glue?
Re: ETS-1526AL -Fabrication of lacking safety mechanisms
thanks Jay and Ding for the suggestions! I'll try Jay's suggestion first (since I'm not too sure if the bracket is plastic, parang hard rubber or fiberglass). Else, I'll do Ding's option.
Will give an update here as soon as I can get time since I'll be busy with my summer duties in these coming days...
Re: ETS-1526AL -Fabrication of lacking safety mechanisms
If you do try Jay's suggestion, you may want to strengthen it by drilling a small hole each in the main gear where the JBWeld teeth will go into. This means that, aside from the chemical bonding (if it will bond), you will have a mechanical bond in the form of hardened JBWeld epoxy inserted into the main gear.


