


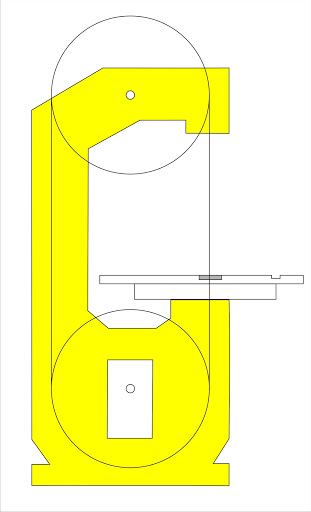
Umandar naman ang pagka-DIY ko. I'm building a bandsaw made of phenolic plywoods na pagdidikit-dikitin ko. 14" ang magiging sukat ng wheels.Medyo malayo ito keysa sa mga gawa ng idol kong si Matthias Wandel kasi yung tension adjuster ko ay hindi sa ibabaw ng frame at mas simple gawin to.
On the drawing board using CorelDraw:
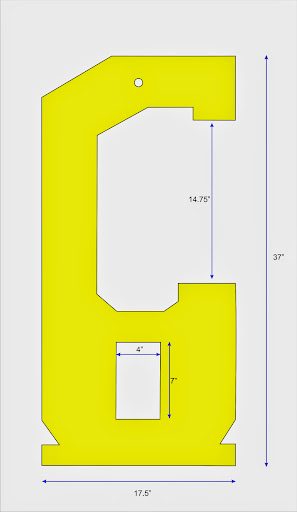
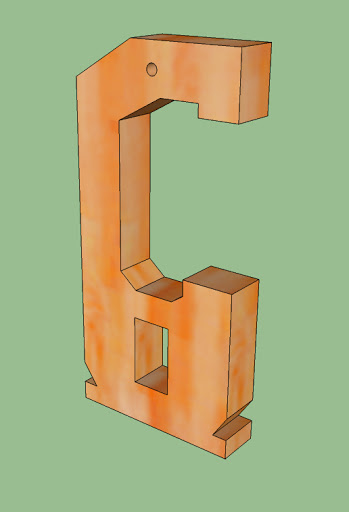
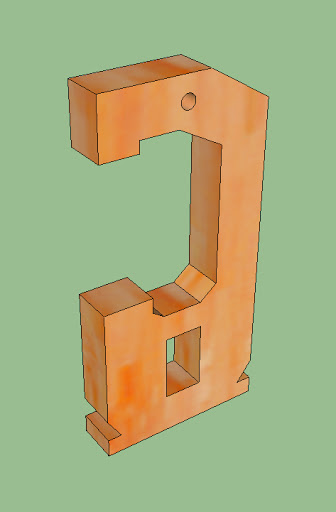
I then exported the illustration to Sketchup to come with 3D drawings:
Re: DIY Bandsaw
Another masterpiece from the DIY master.
Subscribed!
Curious lang. How are you going to glue the phenolic plywood together? The normal wood glue can't be used because the grains are covered by phenolic film.
Re: DIY Bandsaw
Another masterpiece from the DIY master.
Subscribed!
Curious lang. How are you going to glue the phenolic plywood together? The normal wood glue can't be used because the grains are covered by phenolic film.
Thanks joey for the input, if sanding off the film fails the next option is marine ply.
Re: DIY Bandsaw
The Tension Adjustment mechanism:
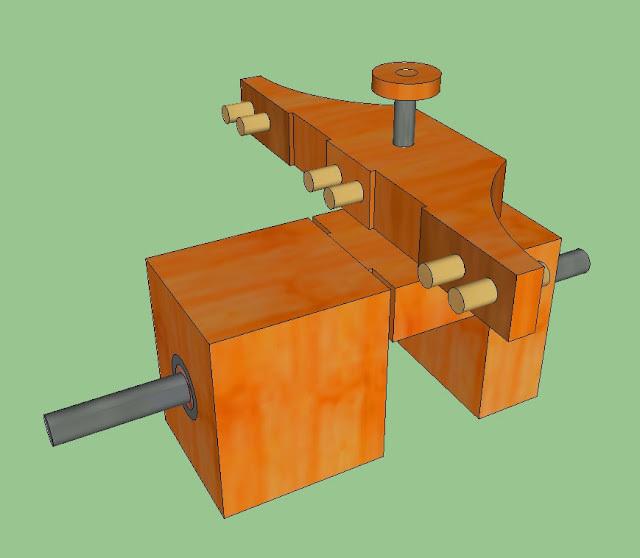
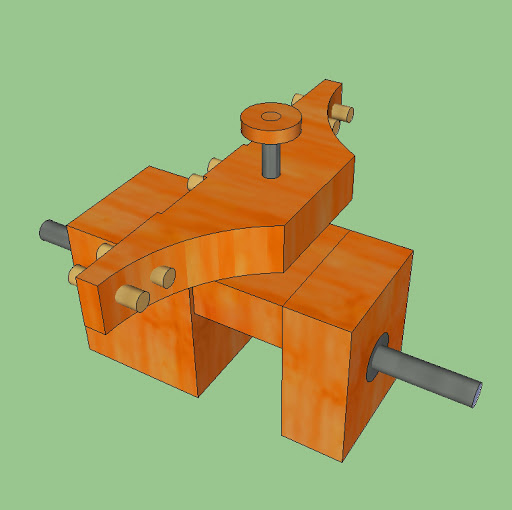
The upper block with long screw will be attached to the frame by dowels or bolts and nuts. The lower blocks with the shafting will be moving vertically once the long screw is rotated.
Re: DIY Bandsaw
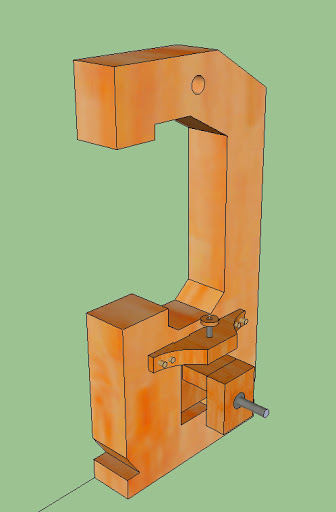
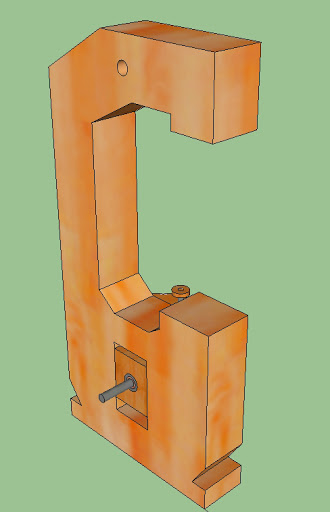
Once inserted sa square hole eto hitsura nya:
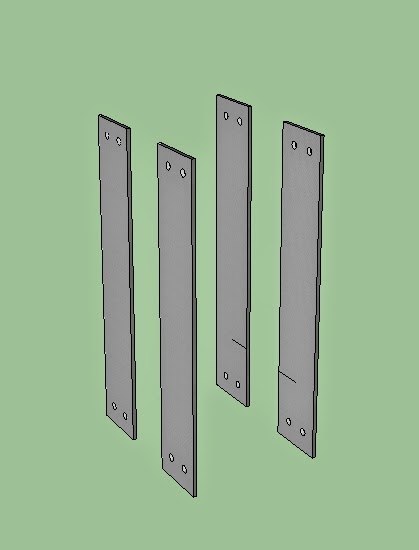
To prevent the whole mechanism from tilting, I will add flat bars:
Re: DIY Bandsaw
Para maging ganito:
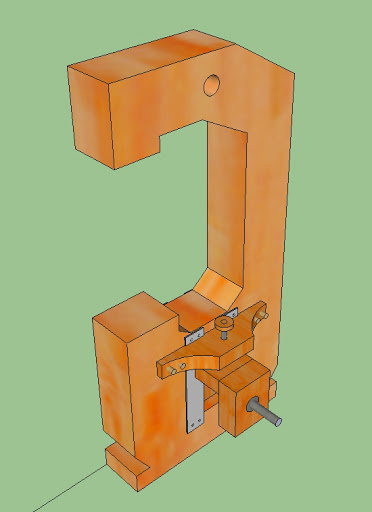
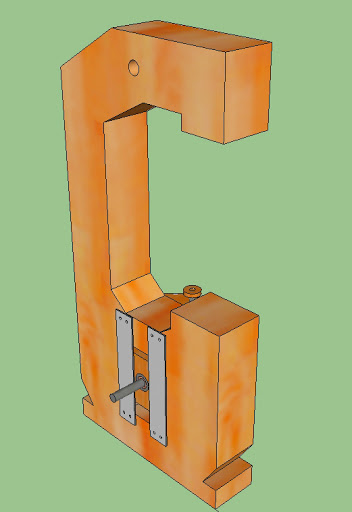
and here's the close up view:

gawin ko muna yung frame and adjustment mechanism bago ko ituloy sa wheels and blade guides.
Re: DIY Bandsaw
The Tension Adjustment mechanism:
The upper block with long screw will be attached to the frame by dowels or bolts and nuts. The lower blocks with the shafting will be moving vertically once the long screw is rotated.
To minimize tilting/racking the long screw must be as near as possible to the wheel. Maybe putting it on the frame itself might be better?
Re: DIY Bandsaw
To minimize tilting/racking the long screw must be as near as possible to the wheel. Maybe putting it on the frame itself might be better?
May point ka dun joey at yun talaga ang unang plano ko kasi mas maigsi ang shafting but there were two things that I consider:
1. Adding another hole on top of the square hole may weaken the structural strength of the plywood frame.
2. Yung eccentric force sa axle ay malakas kaya dinoble ko yung bushing block na reinforced naman ng flat bars.
I might still consider your option Joey during the build, bago ko ko lagyan ng long screw tignan ko muna yung actual build kung pwede.
Plano ko sa frame is six layers of 3/4" plywood or 7 seven layers if undesized at 5/8".

Re: DIY Bandsaw
Armand, I applaud your fearless approach into diy. I do have some concerns about the build. First is the arm, would six pieces of ply hold the blade once you tension it. Next, would the location of the wheel screw hold with the tension as well. 14" opening is huge and really stresses everything. Where would you find the rubber for the wheel and how much would it cost?
How much would the estimated build set you back?

click my signature and it will take you there........
Re: DIY Bandsaw
Thanks Timber and joey81, both concerns are valid and I think i need to consider all of them and I should make some adjustments. First the 14.75" opening will have a final measurement at around 10.5" once the table and the blade guides are installed and I agree that the arm is too long. If I want to have an 8" opening then I may have to reduce the arm by 2 inches. I hope it would substanially help in reducing the stress. Aside from that adjustment, I plan to reinforced the frame with flat bars attached at both sides. On the wheel screw, while joey suggested moving it on top of the square hole I may have to modify the design as well by adding angle bars for added support. I'm also thinking of using scissor jack as a final solution.
Most DIYed bandsaws i've seen in the internet are using bicycle rubber interiors wrapped on the wheels (inner parts were cut away). Bandsaws in Taytay are using flat belts glued (rugbbied) to the iron wheels. Both options are working and I might consider one of them depending on wheels that i'm going to use.
Thanks for the comments again.

Re: DIY Bandsaw
Subscribed!!!!!!!
watch mode hehehehhehe
goodluck
Re: DIY Bandsaw
Armand, why not redesign it altogether? Instead of a G type frame maybe you can try a H type wherein the table is mounted between two pillars. You can always make it wider to fit your needs, and should be stronger. Larger footprint nga lang...
click my signature and it will take you there........
Re: DIY Bandsaw
@Timber
My shop is very small and by adding another equipment with a large base is really a big issue. For this same reason I installed casters to my drumsander, table saw, and my thicknesser so that i can just wheel them away from the center of the working area when not in use.
In redesigning, I already considered shortening the length of the vertical arm by 2 inches and by putting the shaft of the upper wheel on top of the frame so that I can maintain the wide opening. Flat bars contoured to the shape of the G will sandwich the frame for added strength.
My focus now is stabilizing the tensioner assembly and I'm hopeful that this is doable.
Update on this build: The template of the frame is ready for cutting tomorrow.
Re: DIY Bandsaw
WIP pictures of the DYI bandsaw:

Nakatayo na ang template ng G frame. I used 1/4" plywood painted it white para malinaw ang layout. I cut it using the router with the aid of router sled para makinis ang cut. At the right is my "blueprint" wala na kasing ink yung printer ko may kumuha.

Re: DIY Bandsaw
Subscribing again to this very wonderful project, again from the man who has a knack for DIYing
woodworking machinery. Hope my description of what he does is correct. Regardless, I will be following the build and would enjoy watching the entire process of the WIP.
Bro Armand, I salute you again and good luck with this project of yours. :2thumbsup:
CHEERS !!! :cheers: :whistle:
CIGWELD Weldskill 250 amp Mig Welder
AHP Alpha-TIG 200X welder
HITRONIC 300 Amp DC Inverter IGBT Welder
YAMATO 300 amp AC Stick Welder
YAMATO 200 amp DC Inverter IGBT Welder
DeWALT Chopsaw
HOBART and ESAB Welding Helmets
cloned STIHLs
MS 044 chainsaw
MS 070 chainsaw


