


Re: DIY Bandsaw
...By the way, have you considered incorporating a speed reducer for your motor like a worm gear reducer or frequency inverter? It makes a lot of difference in cutting and blade longevity.
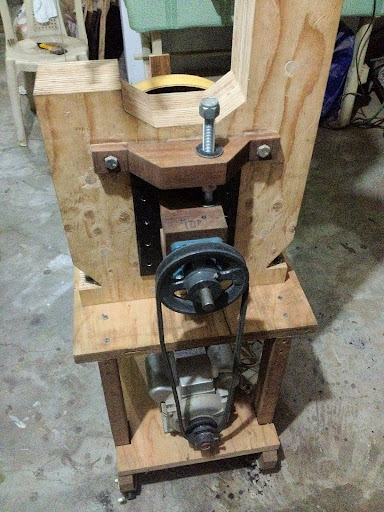
none sir coz that would be too costly na. What I configured is in order to achieve a blade speed of around 3300 fpm (feet/minute, recomended for 14" bandsaw) i got a 2:1 ratio of my two pulleys (6" and 3" drive pulley).
Having a 1hp motor with 1,740 rpm, 14.25" wheels (including flat belt) and 2:1 pulley ratio, i will arrive to this equation:
1740 rpm / 2 (pulley ratio) = 870
870rpm x wheel circumference (14.25 * 3.14159) = 38947.86
38947.86 / 12inches = 3,245.65 fpm
I will have to live with this configuration but should there be a need to reduce the speed I can easily install a 7" pulley to get a 2786 fpm. Manual adjustment nga lang ang mangyayari.
Sir let me know from your experience the desired speed for general purpose cutting, pwede ko pang palitan ang pulley ko hanggat di pa nagagamit. Di kasi ako masagot ng mga taga Taytay and I just relied my numbers from what i read in internet. Thanks in advance.
Re: DIY Bandsaw
none sir coz that would be too costly na.
I will have to live with this configuration but should there be a need to reduce the speed I can easily install a 7" pulley to get a 2786 fpm. Manual adjustment nga lang ang mangyayari.
Sir let me know from your experience the desired speed for general purpose cutting, pwede ko pang palitan ang pulley ko hanggat di pa nagagamit. Di kasi ako masagot ng mga taga Taytay and I just relied my numbers from what i read in internet. Thanks in advance.
I saw some multiple pulleys like those in drill press speed adjusters. If you can get hold of one at least you are able to vary your speed by 2-3 settings. When cutting thicker stock the slower the speed the lesser blade heat I've noticed, hence longer blade life plus the cut is controlled better. For thinner stock it's the other way around and lesser tear out. Just switch the main pulley drive to a multiple one and your good to go. Of course you have to modify motor base mounting slots to accommodate pulley adjustments. You can also order those pulleys from SYGAL, INC. should you have difficulty finding one. I'd be happy to order from the owner 'coz he's a friend of mine. Just PM me the arbor size. If you can paint your set up with Epoxy paint or any kind of water proof coating then you might want to attach a drip type blade cooler hose much like those you find in Large Bandsaws. Just use a conventional drip bottle for rabbits from pet shops and attach a fuel hose w/ plastic drip controller for aquarium hoses and attach a metal tip cut from the drip bottle then place underneath the blade guide blocks and adjust drip small enough that nothing is left to settle at the base of the wheel. You get the idea, and you can modify it to suit your design and usage.:trampoline:
Re: DIY Bandsaw
Also when cutting green wood the speed must be slower especially w/ wood with gum or resin.
Re: DIY Bandsaw
very nice idea Sir on multiple pulley, Thank you so much, :thanks: level up bandsawing na ito with blade cooler pa.. can't wait to try my hands na.
Re: DIY Bandsaw
Seized the holiday very early and went straight to Tony's for my compression springs. Sir @willyfernando was right they have plenty of it and I hurriedly bought 2 pcs coz my car is illegally parked on the street side. Its different here in Marikina very strict ang mga traffic aides hatak agad.
Here are my springs, i got two different sizes, one is stronger than the other so i will have a choice later on.

.
and here already inserted between the block and frame, just temporary I will just insert something to keep the spring in place. I can tell it really works.

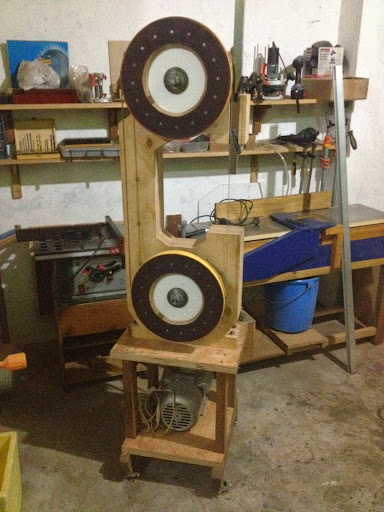
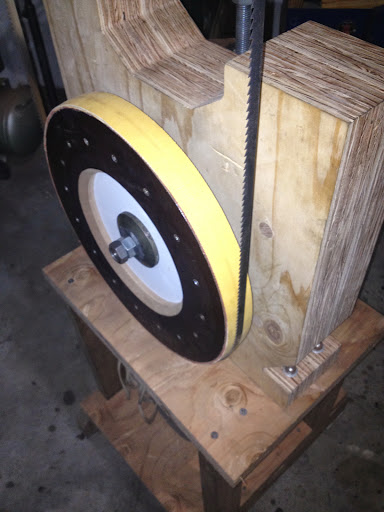
the front side shown here with the blade already installed, the yellow thing around the wheels are the tires made of flat belt locally known as "korea". The stainless bar for my blade guide is also being dryfitted here.
the motor is from my old drum sander which is very noisy.
.
a closer view of the lower wheel with the yellow tire and the blade.
Re: DIY Bandsaw
backside pictures:

.
it looks very close na to my design.

.
I was able to made it run and took a video and was so happy with the partial success of this project. I will upload the video to youtube tom.
Re: DIY Bandsaw
Here is the video that I took lastnight of my band saw already running with the blade. A little bit noisy due to the slack v-belt installed in the pulleys, I may have to add a belt adjuster later on to address it. The motor that I am using is Mindong brand china made 1hp from my old DIY drum sander.
click here: [COLOR="RoyalBlue"]Youtube VIDEO.
Re: DIY Bandsaw
That is a VERY smooth running Armand.
Really nice and steady build!
Did you try to cut without the guides?
Have you tensioned the blade?
Re: DIY Bandsaw
Did you try to cut without the guides?
Have you tensioned the blade?
no of course, i want to use this machine with still complete fingers on both hands 😀
yes the blade was tensioned to the maximum that i know ;)..i placed the blade between my index finger and thumb and made sure the blade can only flex up to 2 to 3 mm on either sides (according to google).
hey dimitris..pls introduce yourself to us properly by going to Gazebo - Members Introduction and tell us about yourself, your current location, etc. Thanks
Re: DIY Bandsaw
no of course, i want to use this machine with still complete fingers on both hands 😀
yes the blade was tensioned to the maximum that i know ;)..i placed the blade between my index finger and thumb and made sure the blade can only flex up to 2 to 3 mm on either sides (according to google).
hey dimitris..pls introduce yourself to us properly by going to Gazebo - Members Introduction and tell us about yourself, your current location, etc. Thanks
I will but where is this section?
I noticed that you dont have any tracking correction system, are you going to use your upper plate if the tracking goes off?
How the flanges that hold the wheells on the shaft called?

Re: DIY Bandsaw
@ dimitris,
Scroll down the PHM index page and just under the Gazebo Forum is the MEMBER INTRODUCTIONS, there you can start your own thread and introduce yourself to the forum. Whats your hobbies or interest, where are you located etc etc, but nothing really that is personal. :p
We just want to know you better as a person and as a member. 😉
THANKS,
rosy
CIGWELD Weldskill 250 amp Mig Welder
AHP Alpha-TIG 200X welder
HITRONIC 300 Amp DC Inverter IGBT Welder
YAMATO 300 amp AC Stick Welder
YAMATO 200 amp DC Inverter IGBT Welder
DeWALT Chopsaw
HOBART and ESAB Welding Helmets
cloned STIHLs
MS 044 chainsaw
MS 070 chainsaw
Re: DIY Bandsaw
I will but where is this section?
I noticed that you dont have any tracking correction system, are you going to use your upper plate if the tracking goes off?
How the flanges that hold the wheells on the shaft called?
The lower wheel is fixed in its position, the upper wheel will follow the alignment of the lower wheel by adjusting those pillow block bearings. I guess this is how a shopmade equipment should be, lacking those easy to grab and easy to adjust features of a fully factory made machines.
We call those flanges here as "circular saw lock".
I just finished painting the body and its base this past saturday and will proceed slowly to finish the whole project coz I want to take a short break. The three remaining parts needed to be done to complete this are the blade guide, guide post, and the table.
Re: DIY Bandsaw
I just finished painting the body ......
Pictures or never happened!!! :D:D:D:D
Re: DIY Bandsaw
Pictures or never happened!!! 😀

just a teaser..:p
Makita green (Made-in-China)
Re: DIY Bandsaw
just a teaser..:p
Makita green (Made-in-China)
Hey...that's the classic DIY colour!!!
Why you chouse to go with the moving sfaft instead of a putting the bearings only on the wheels and the saft beign steady to the frame?


