


Re: DIY Bandsaw
direct upload from my celfone didn't work so i'm reposting it..

The top cover is primered and only needs topcoat tomorrow same color with the bottom covers of the table.
sorry that's the only photo I took today..:p
Re: DIY Bandsaw
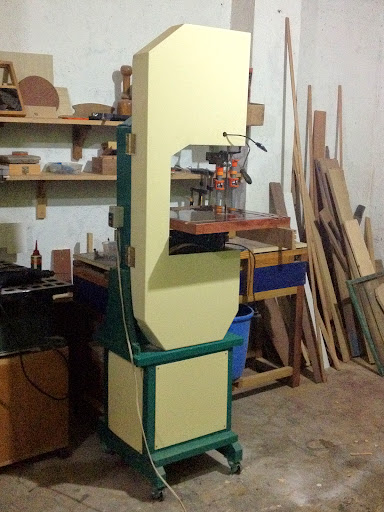
Photo update of my bandsaw build.

The cover has been installed and it is now almost finished. There is also an adjustable LED light on the cover that switches on/off with the machine. The table (on my table saw) and the blade cover will also be installed by tomorrow and hopefully make a test cut.

Re: DIY Bandsaw
Wow! Ready for action na ba yan sir armand?
Tindi talaga ng pinoy sa DIY projects!galing!:groupwave:
Re: DIY Bandsaw
Wow! Ready for action na ba yan sir armand?
Tindi talaga ng pinoy sa DIY projects!galing!:groupwave:
yes @bugel by tomorrow afternoon gugupitin ko pa kasi yung GI sheet para sa cover ng blade at para hindi tamaan kilay ko.
Re: DIY Bandsaw
Finally I have finished this DIY bandsaw project yesterday. The last component that i have to build later is the blade cover but i can declare that this is officially done and probably this is the conclusion of the WIPs. There is just one minor problem, the blade that i got is very bad. For hours yesterday I been trying to eliminate the drift coz the cut curves to the right. I was really puzzled coz I already followed all the instructions on getting rid of the drift but still the cut goes to the right. Then I realized that the drift is not straight but curved as seen on the photo below. Normally when the blade drifts the cut should be angled and only not parallel to the fence. I noticed too that left side of the blade burns the wood while it curves to the right. The next thing I did was I touched the blade and slid my fingers along the blade and found out that the left side of the blade is very smooth as if there are no teeth at all while the right side is very rough and you can feel all the teeth are angled towards the right side. This is the real cause of the burn on the wood and the curve to the right. I then grabbed my honing stone and rubbed it along the right side of the blade and the curve significantly reduced but still it curves. I feel like I was duped by Mario Merchandisng for selling me a defective blade and for giving me a 5 TPI blade which cuts so slow and not for general cutting use. I may have to source my next blade from Panda.
Here are the last photos of this project.
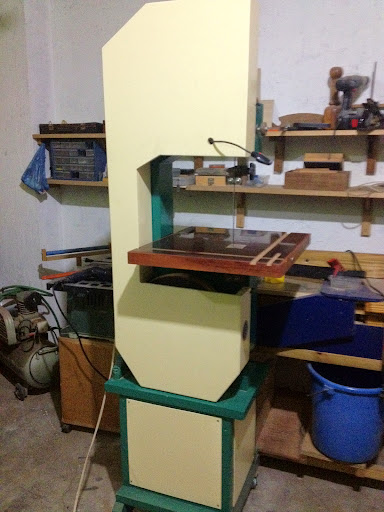
The DIY bandsaw now with the cutting table.
.
.
With the LED lamp.
.
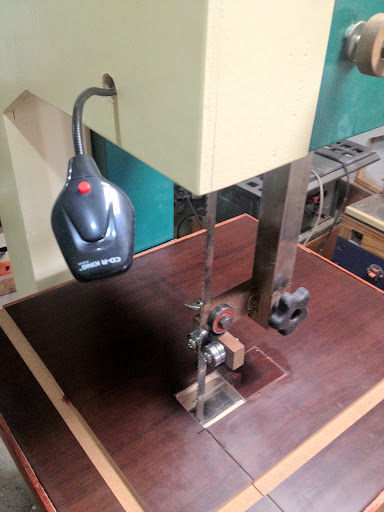
The table top with acrylic insert. I made a mistake in first cutting of the hole.

Re: DIY Bandsaw
This is how it looks under the table.
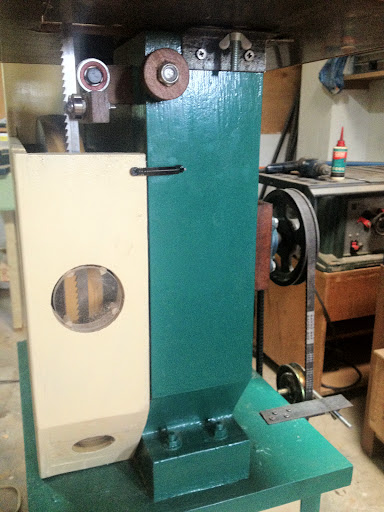
There are two holes on the cover, one for checking if the blade still tracks right on the wheel and the other for dust collection. The table table is secured with three wingnuts againts the angle bars, and at right is the belt tensioner also attached thru angle bar.
.
and here are the test cuts..

not straight but curved.
.
shiny and and burnt..this is the wood after passing through the left side of the blade.


Re: DIY Bandsaw
and thats it.. thanks for following this project. I will upload a video of this once I got my new blade.

Re: DIY Bandsaw
There is just one minor problem, the blade that i got is very bad. For hours yesterday I been trying to eliminate the drift coz the cut curves to the right. I was really puzzled coz I already followed all the instructions on getting rid of the drift but still the cut goes to the right. Then I realized that the drift is not straight but curved as seen on the photo below. Normally when the blade drifts the cut should be angled only not parallel to the fence. I noticed too that left side of the blade burns the wood while it curves to the right. The next thing I did was I touched the blade and slid my fingers along the blade and found out that the left side of the blade is very smooth as if there are no teeth at all while the right side is very rough and you can feel all the teeth are angled towards the right side. This is the real cause of the burn on the wood and the curve to the right. I then grabbed my honing stone and rubbed it along the right side of the blade and the curve significantly reduced but still it curves. I feel like I was duped by Mario Merchandisng for selling me a defective blade and for giving me a 5 TPI blade which cuts so slow and not for general cutting use. I may have to source my next blade from Panda.
and here are the test cuts..
not straight but curved.
.
shiny and and burnt..this is the wood after passing through the left side of the blade.
-------------------------------------------------------------------------------------------------------------------
Bro Armand, first of all I would like to congratulate you again for your DIY Bandsaw project, "ANG GALING MO TALAGA" hanga ako sa patience and vision mo sa mga ginagawa mo, saludo ako sa'yo bro.
Anyway going back to your blade, I have noticed that yung test cuts mo ay medyo paling (not straight), perhaps you need to have a movable straight edge guide attached to its table, hope its the right term for it, para duon naka agapay yun wood na puputolin mo.
Bro, another reason for non straight cuts is due to un even sharpness of the cutters, that is why the cuts are moving to the direction of left or right. I am saying this coz I have the same experience with my garden bow saw also with thick blades, every time I cut a log, the blade would veer to the left always so I had it sharpened in one of those small shops in Tanay market, yung mga nag hahasa ng lagare. yun ayos na, dumeretso narin yung cuts. Perhaps you need to have your blade re sharpened and check yung opening ng mga cutters, baka hinde even kaya kumakabig sya sa isang direction. 😮
CIGWELD Weldskill 250 amp Mig Welder
AHP Alpha-TIG 200X welder
HITRONIC 300 Amp DC Inverter IGBT Welder
YAMATO 300 amp AC Stick Welder
YAMATO 200 amp DC Inverter IGBT Welder
DeWALT Chopsaw
HOBART and ESAB Welding Helmets
cloned STIHLs
MS 044 chainsaw
MS 070 chainsaw
Re: DIY Bandsaw
Thanks bro Rosy.
Bro, another reason for non straight cuts is due to un even sharpness of the cutters, that is why the cuts are moving to the direction of left or right. I am saying this coz I have the same experience with my garden bow saw also with thick blades, every time I cut a log, the blade would veer to the left always so I had it sharpened in one of those small shops in Tanay market, yung mga nag hahasa ng lagare. yun ayos na, dumeretso narin yung cuts. Perhaps you need to have your blade re sharpened and check yung opening ng mga cutters, baka hinde even kaya kumakabig sya sa isang direction. 😮
This is exactly what I described above bro Rosy, makinis yung kaliwang side ng blade kaya sunog din yung kahoy galing sa kaliwa ng blade while on the right side nandun lahat ng talim ng blade kaya ang blade kumakagat lang sa right side. Hopefully may makita ako naghahasa ng bandsaw blade. or i-DIY ko na din paghahasa mamaya he he..
Re: DIY Bandsaw

.
Congrats sir armand!
Sir san mo nabili yung knob na ginamit mo sa bandsaw mo at kung ano ang tawag jan..kailangan ko kasi yan eh..TIA..
Re: DIY Bandsaw
.
Congrats sir armand!Sir san mo nabili yung knob na ginamit mo sa bandsaw mo at kung ano ang tawag jan..kailangan ko kasi yan eh..TIA..
Thanks @bugel.
Nakuha ko lang din sa Rockler Thin Rip Jig na nabili ko kay JayL. Try mo sa mga screw and nuts stores meron sila pero may kasama ng screw na 5/16" pero maigsi lang 1 inch ang haba.
Re: DIY Bandsaw
I was right i have a faulty bandsaw blade. After watching this evening useful tips in youtube for bandsaw blade sharpening I immediately begun my own task of sharpening my blade by using my small file. I was hesitant of its effectiveness so i filed each tooth very lightly. After almost an hour of filing the teeth, I re-installed the blade right away and made a test cut, to my surprise the drifting has gone and it now runs quieter and faster. I can only surmise that blade could have developed some fatigue while it was stored at the seller. I am now a happy user of my DIY bandsaw. 🙂
There is a specific tooth bend or tip angle you need to adjust so that the cut or kerf will make the blade cut smoother and cooler. Most new blades do need sharpening and Tip setting for first time use.
Re: DIY Bandsaw
got your PM reply Willy, thank you.
Re: DIY Bandsaw
Armand, Let me show you what our dear friend Dr. Jonathan Cruz saw in my shop. We slice around 20,000 board feet of wood per month. I think that'll give you an idea of how vast our experiences are with BS's and how we work our way around issues like yours and many others. Just take the time to learn the techniques we have developed in processing while you have the opportunity much like how we helped Bro.Jonathan with his church door build. He now has extensive knowledge in base production and finishing. It is now up to him to develop it whether for DIY or business.


