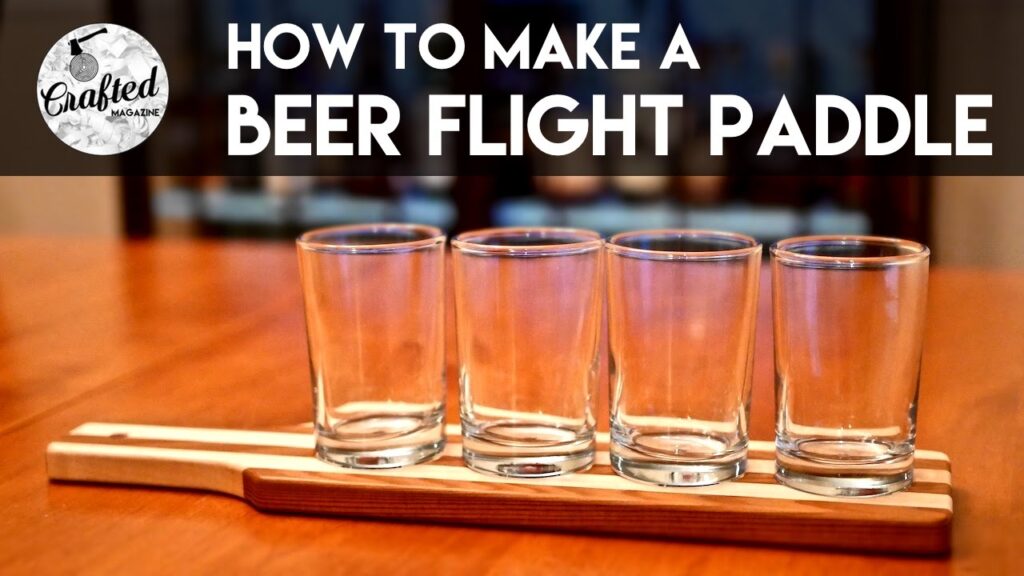
Hey there! In this article, we’re going to show you how to build a beer flight paddle. This crafty project is perfect if you have some scrap hardwood lying around, and it’s also a great item to sell at craft fairs or online. First, you’ll need to gather the materials, including old redwood and hard maple strips. Then, you’ll mill the wood to remove the aged faces and get it square on all sides. After that, you’ll rip the strips and arrange them in the desired pattern before gluing them together. Next, you’ll create a template for the flight paddles to ensure consistent results. Finally, you’ll cut out the handle shape, drill the holes for the flight glasses, and sand and finish the paddle. It’s a fun and rewarding project, so why not give it a try?
Preparing the Wood
Milling the wood
To start building your beer flight paddle, you’ll need to prepare the wood. Begin by milling the wood to remove the aged faces and square it on all four sides. If you have a piece of old or reclaimed wood like redwood, make sure to remove any wear and tear to reveal the beautiful wood underneath. Use a planer and jointer to achieve a smooth and square surface.
Arranging the strips
Once you have squared up the wood, it’s time to create the strips for your beer flight paddle. Using a table saw, rip the wood into 3/4 inch wide strips. The number of strips you need will depend on the size of your paddle. If you want to maximize the use of your wood, you can also use scraps of a different type of wood, like hard maple, and rip them into 3/4 inch strips as well.
Arrange the strips in the order you want them to be in the final piece. Take into account the contrast of colors between different types of wood for a visually appealing design.

This image is property of i.ytimg.com.
Cutting the pieces
Once you have arranged the strips, it’s time to cut the pieces of your beer flight paddle. Use a miter saw with a stop block set at 14 and a half inches to cut the pieces from the arranged strips. This method ensures consistent and accurate cuts. Repeat this step until you have cut all the pieces you need for your beer flight paddle.
Gluing and Flattening
Gluing the pieces
Now it’s time to assemble your beer flight paddle. Apply glue to the edges of the cut pieces and press them together, aligning them according to the arrangement you created earlier. A style of parallel bar clamp is recommended for this glue-up to keep the bottom flat and avoid material loss. Make sure to wipe away any excess glue with a wet paper towel before it dries.

This image is property of images.unsplash.com.
Flattening the bottom
Once the glue has dried, remove the clamps and flatten the bottom of your beer flight paddle. Use a jointer to shave off a small amount of material, just enough to achieve a perfectly flat surface. This flattened surface will serve as your reference surface for the next steps.
Creating the Template
Marking the handle and curves
To create a template for your beer flight paddle, you need to mark the handle and curves. Measure three-quarters of an inch from each long edge and four inches from the end of the paddle, marking these lines. These lines will indicate where you will remove the material to create the handle. Connect these lines to the edges of the paddle with a curve to add a visually appealing design element.

This image is property of images.unsplash.com.
Determining hole spacing
To determine the spacing for the holes that will hold the flight glasses, you need to do a bit of math. Measure the distance from the end of the handle to the end of the paddle, which should be approximately ten inches. Divide this total distance by the number of glasses you want to include, plus one for each end. This will give you the spacing between each glass.
Marking hole placement
Using a forstner bit with a two-inch diameter, mark the hole placement on your beer flight paddle. Measure three-eighths of an inch from the handle and then add two inches for a glass. Repeat this process for each glass, marking the center of each two-inch area. The intersection of the centerline and the marked lines is where you will drill the holes.
Cutting and Shaping

This image is property of images.unsplash.com.
Cutting the handle
With the hole placements marked, it’s time to cut out the handle of your beer flight paddle. Use a bandsaw to remove the bulk of the waste from the handle cutouts. Be careful and take your time to ensure accurate cuts.
Sanding the shape
After cutting the handle, move on to sanding the shape of your beer flight paddle. Use an oscillating spindle sander or belt sander to sand along the marked lines for the handle and curves. This step allows you to finalize the shape of your paddle. Feel free to round the sharp corners or customize the shape to your liking.
Cutting excess waste
Once you are satisfied with the shape of your beer flight paddle, transfer the handle lines to the workpiece and cut away the excess waste using a bandsaw. This step ensures a clean and polished final product.
Drilling Holes
Drilling small reference holes
To ensure accurate placement of the holes for the flight glasses, start by drilling small reference holes. These holes will act as guides, allowing you to transfer the hole placement to the workpiece without redoing the layout work for every paddle.
Cutting the handle hole
Next, move on to drilling the hole in the handle of your beer flight paddle. Use a two-inch forstner bit to create the hole, setting the depth to about a quarter of an inch. This hole will allow you to hang the paddle when not in use.
Cleaning up the holes
After drilling the holes, clean them up using 120-grit sandpaper. Make sure to remove any rough edges or excess material for a smooth and professional finish. Consider experimenting with different RPM settings on your drill press to find the best approach to create cleaner holes.
Sanding and Finishing
Sanding the entire piece
To achieve a smooth and polished surface, sand the entire beer flight paddle using 220-grit sandpaper. This step ensures the removal of any imperfections and prepares the wood for finishing. Make sure to sand in the direction of the wood grain for the best results.
Applying finish
When the sanding is complete, it’s time to apply the finish to your beer flight paddle. You can use spray lacquer, which provides a durable and protective finish. Apply multiple coats of finish, allowing each coat to dry before applying the next.
Sanding between coats
To achieve a professional and glossy finish, sand between each coat of finish using 320-grit sandpaper. This step helps to smooth out any imperfections and ensures a smooth application of each subsequent coat. Take your time and be patient with this step for the best results.
Conclusion
Congratulations! You have successfully built your own beer flight paddle. This project not only allows you to utilize scrap hardwoods but also offers an opportunity for potential sales at craft fairs or on your website. Once you have created a template, the process becomes more efficient, and you can easily produce more paddles. Remember to enjoy the process and have fun building your beer flight paddle.


