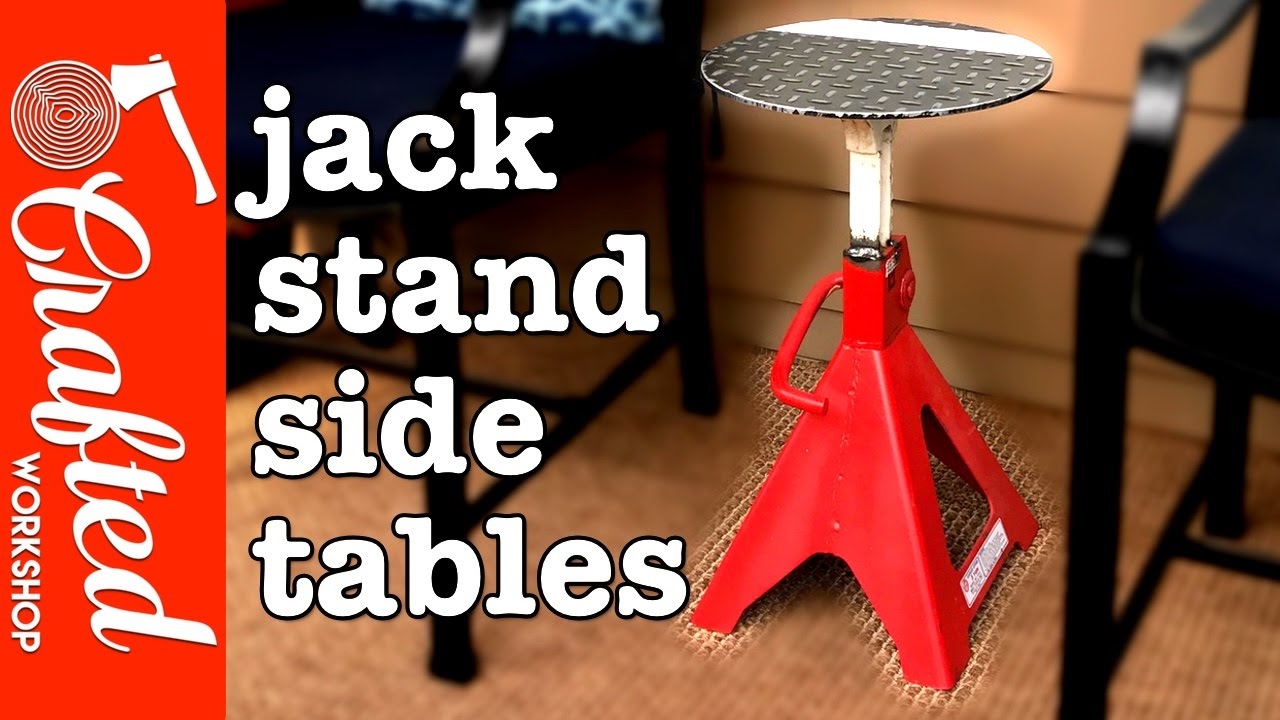
Hey there! In this article, we’re going to show you how to transform vintage jack stands into stylish side tables. The idea for this project came about when my parents were cleaning out their attic and stumbled upon these jack stands they had stored away. We thought they would make perfect side tables, and it was also a great opportunity for me to make use of my plasma cutter. If you don’t have a plasma cutter, don’t worry! We’ll provide some alternative methods for cutting the tabletops. So stay tuned as we guide you through the process of creating these unique and functional side tables.
Once we had the tabletops cut, we had to consider the gaps at the edges of the jack stands. To ensure a secure weld, we measured and cut small pieces to go between the tabletops and the stands. After cleaning up all the pieces, it was time to start welding. Throughout the process, we encountered some challenges, like dealing with dross buildup and even breaking a belt on the grinder. But with a bit of perseverance, we were able to overcome these obstacles and achieve sturdy and visually appealing side tables. So if you’re ready to bring new life to those old jack stands, let’s get started!

This image is property of i.ytimg.com.
Choosing the Right Vintage Jack Stands
When choosing vintage jack stands for your side tables, it’s important to evaluate the condition of the stands. Look for any signs of damage or wear, such as rust or bent metal. Make sure the stands are still sturdy and able to support the weight of a tabletop.
Another important factor to consider is the weight capacity of the jack stands. Determine how much weight you plan to place on the side tables and choose stands with a weight capacity that exceeds that amount. This will ensure that the tables are stable and safe to use.
In addition to the condition and weight capacity, it’s worth considering a unique design for your side tables. Vintage jack stands often have a unique and interesting aesthetic that can add character to your space. Look for stands with interesting shapes or details that align with your personal style.
Gathering the Necessary Tools and Materials
Before starting the project, gather all the necessary tools and materials. Some of the tools you will need include a plasma cutter and its accessories, an angle grinder, a belt sander, a welding machine, a grinding wheel and flat disc, sandpaper, denatured alcohol, and paint and a paintbrush.
The plasma cutter and its accessories will be used to cut the tabletop circles. If you don’t have a plasma cutter, there are alternative options. You can use an angle grinder to cut out a square or rectangular tabletop, or you can find a friend who has a plasma cutter and borrow their machine. Another option is to find a local fabrication shop that can cut the circles for you at a reasonable price.
The angle grinder and belt sander will be used to clean and prepare the jack stands and small support pieces. The welding machine will be used to attach the various pieces together. The grinding wheel and flat disc will be used to grind down welds and sand the tabletop. Sandpaper and denatured alcohol will be used for surface preparation, and paint and a paintbrush will be used for finishing touches.
Preparing the Jack Stands
Before starting any modifications, clean the jack stands thoroughly. Remove any dirt, grease, or debris from the surfaces using a cleaning solution and a rag. This will ensure that the paint and primer adhere properly to the stands.
If there is any rust or old paint on the stands, it’s important to remove it before moving forward. Use a wire brush or sandpaper to scrape off the rust and paint until you’re left with clean metal surfaces.
After removing the rust and paint, sand the surfaces of the jack stands to create a smooth and even texture. This will help the paint and primer adhere better and create a more professional-looking finish.
If necessary, apply a primer to the jack stands. This will create a base coat that helps the paint adhere better and provides additional protection against rust.
Creating the Tabletop Circles
To create the tabletop circles, you will need a plasma cutter. Use the plasma cutter to cut circles from quarter-inch diamond plate steel. The size of the circles will depend on the dimensions of your jack stands and the desired size of the tabletops.
If you don’t have access to a plasma cutter, there are alternative options. One option is to create a square or rectangular tabletop and cut it out with an angle grinder. Another option is to find a friend who has a plasma cutter and ask to use their machine. Lastly, you can find a local fabrication shop that can cut the circles for you at a reasonable price.

This image is property of pixabay.com.
Cutting Small Pieces for Support
Measure and mark the dimensions of the small support pieces that will go between the bottom of the tabletop and the top of the jack stands. Use an angle grinder to carefully cut the pieces according to your measurements.
After cutting the pieces, use a belt sander to grind them down. This will flatten the small pieces and clean up any rough edges. It will also help create a more seamless transition between the tabletop and the jack stands.
Welding the Filler Pieces
Before welding the filler pieces, tack them in place using a welding machine. This will ensure that they align properly and stay in position during the welding process.
Run a bead on each side of the filler pieces to securely attach them to the bottom of the tabletop. This will create a strong connection and provide extra support.
After welding, grind down the welds using a grinding wheel. This will smooth out any rough spots and create a more finished appearance.

This image is property of pixabay.com.
Attaching the Tabletop to the Jack Stands
Position the jack stands and the tabletop in the desired arrangement. Make sure the tabletop is centered and aligned with the stands.
Tack and weld the tabletop to the jack stands to secure them together. Take extra care to ensure that the welds are strong and evenly distributed for optimal stability.
After welding, check the sturdiness of the side tables. Test them by applying pressure and making sure they can support the intended weight load.
Finishing Touches
After the welding is complete, sand the tabletop using sandpaper. This will create a smooth and polished surface for your side tables.
Clean all the surfaces, including the tabletop and jack stands, with denatured alcohol. This will remove any dirt or debris and ensure a clean surface for painting.
Add unique details to the side tables with paint. Use a paintbrush to apply a coat of paint in your desired color or design. This will add personality and style to your side tables.
For added protection, apply a coat of protective clear enamel to all the surfaces of the side tables. This will help prevent rust and ensure the longevity of your project.

This image is property of pixabay.com.
Benefits of Using Vintage Jack Stands
Using vintage jack stands for your side tables offers several benefits. The unique and interesting design of the stands can add a stylish and eye-catching element to your space. It’s a great way to showcase your personal style and stand out from the crowd.
Vintage jack stands are known for their durable and sturdy construction. They are often made from high-quality materials that can withstand the test of time. This makes them a reliable and long-lasting option for your side tables.
Choosing vintage jack stands is also an environmentally friendly option. By repurposing old materials, you are reducing waste and giving new life to something that might have otherwise been discarded. It’s a sustainable choice that aligns with a more eco-conscious lifestyle.
Conclusion
In conclusion, building side tables out of vintage jack stands is a fun and creative project. By following the step-by-step process outlined above, you can transform these old stands into unique and stylish side tables that will add a touch of character to any space.
Remember to evaluate the condition and weight capacity of the jack stands before starting the project. Gather all the necessary tools and materials, and prepare the surfaces of the stands and tabletops for modification. Cut the tabletop circles using a plasma cutter or alternative methods, and cut small pieces for support.
Weld the filler pieces to the tabletop and attach the tabletop to the jack stands. Finish the side tables by sanding, cleaning, painting, and applying a protective clear enamel. Enjoy the benefits of using vintage jack stands, such as their unique design, durable construction, and eco-friendly nature.
We encourage you to try this project yourself and unleash your creativity. Have fun and happy building!


