


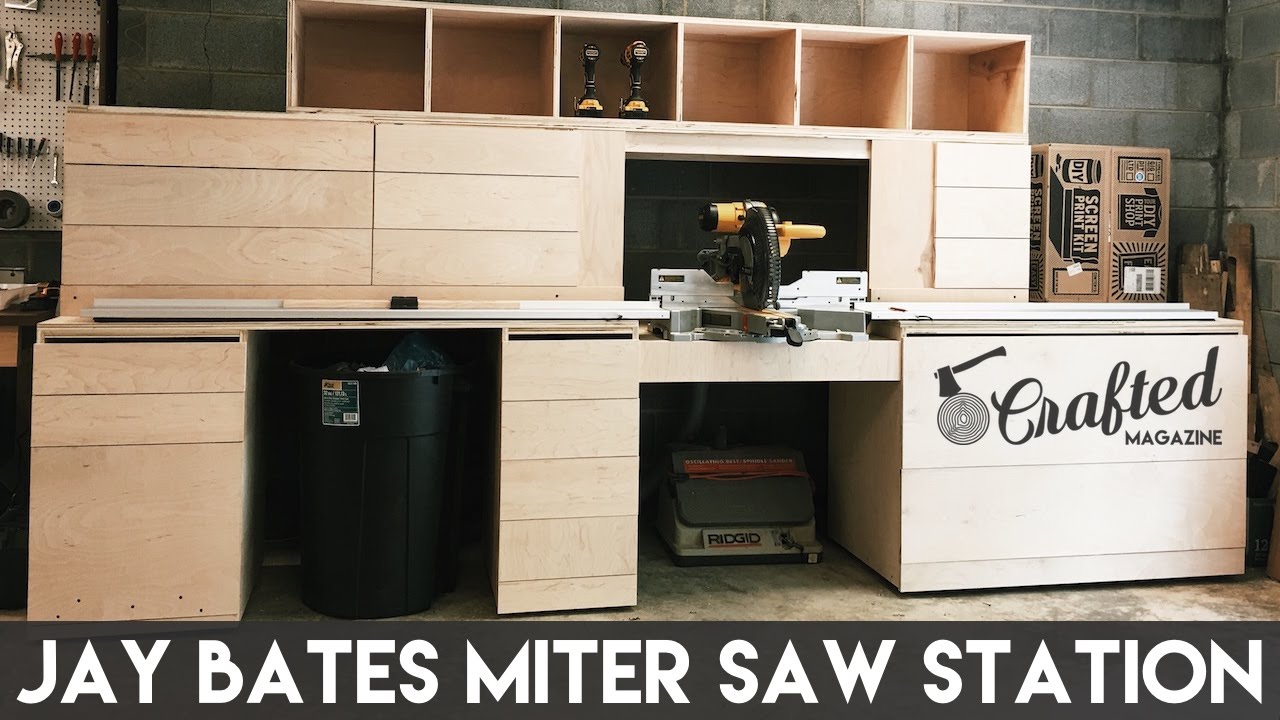
In this two-part video, you will join Johnny Brook as he builds a modified version of the Jay Bates Miter Saw Station. Using Purebond plywood and some essential tools, Johnny takes you through the process of breaking down the plywood and assembling the base cabinets. With the help of Fastcap self-centering pocket hole screws and the Craig Right angle clamp, he ensures a secure and precise construction. He also shares his experience using the Fastcap Best Fence Pro 3 System and removing the pegboard to make way for the new miter saw station. Stay tuned for part two, coming next week, and don’t forget to subscribe to Crafted Workshop for more exciting projects. Happy building!
DIYing the Jay Bates Miter Saw Station: Part 1

Introduction to the project
Welcome to the exciting world of woodworking! In this comprehensive article, we will guide you through the process of building the Jay Bates Miter Saw Station. This project is a fantastic addition to any workshop, providing a dedicated and functional space for your miter saw. With careful planning and attention to detail, you’ll have a sturdy, efficient, and organized work area that will enhance your woodworking experience. So, let’s dive into the first part of this project and start creating your dream miter saw station!
Breaking down the plywood
Before we jump into building the base cabinets, the first step is to break down the plywood into manageable pieces. Using a circular or table saw, carefully cut the plywood into the required dimensions for the cabinet carcasses, shelves, and drawer fronts. Take your time and ensure accurate and precise cuts, as this will greatly impact your miter saw station’s overall look and functionality.
Assembling the base cabinets
Now that you have the plywood pieces ready, it’s time to assemble the base cabinets. Begin by laying out the cabinet sides, top, bottom, and shelves in the desired configuration. Use wood glue and screws to secure the joints, ensuring the cabinet is square throughout the assembly process. Take care to align the edges and countersink the screws to create a clean and professional finish. Repeat this process for each base cabinet, and you’ll soon have a sturdy foundation for your miter saw station.
Clearing out the space
Before installing the base cabinets, you’ll need to clear out the space where your miter saw station will be located. Remove any existing furniture, tools, or clutter that may hinder installation. This step ensures a clean slate for your project and allows you to visualize how the miter saw station will fit seamlessly into your workshop.

This image is property of images.unsplash.com.
Removing the pegboard
If your workshop currently features pegboard walls, it’s time to bid them farewell. To create a cohesive and uniform look for your miter saw station, you’ll want to remove the pegboard from the designated area. Carefully unscrew each panel, not damaging the wall behind it. By removing the pegboard, you’ll have a blank canvas to work with and the ability to customize the area according to your specific needs.
Cutting the support pieces
With the area cleared and the pegboard gone, it’s time to focus on the support pieces that will hold the countertop in place. Measure and cut the support pieces from a sturdy material such as plywood or 2×4 lumber. These support pieces will provide stability and prevent sagging of the countertop over time. Attach them securely to the back and sides of the base cabinets using screws and wood glue, ensuring they are level and flush with the cabinet tops.

This image is property of images.unsplash.com.
Installing the leveling feet
To ensure your miter saw station is level and stable, installing leveling feet on each base cabinet is crucial. Start by flipping each cabinet upside down and attaching the leveling feet to the corners. These adjustable feet allow you to compensate for any uneven flooring or minor irregularities, providing a solid and secure foundation for your miter saw station. Take your time with this step to ensure all cabinets are perfectly level before proceeding.
Building the drawers
Now it’s time to turn our attention to the drawers. Building drawers for your miter saw station is essential for organizing and storing tools, accessories, and other workshop essentials. Cut the drawer pieces to size and construct them using dovetail or box joint joinery for maximum strength and durability. Install drawer bottoms, ensuring a smooth gliding motion, and attach the drawer fronts securely. Build as many drawers as desired, depending on your storage requirements, and remember to sand and finish each drawer for a professional look.
Installing drawer hardware
With the drawers built, it’s time to install the drawer hardware. Decide on the type of drawer slides you prefer – side-mount, under-mount, or full-extension – depending on your personal preference and budget. Carefully mount each slide to the drawer carcass, ensuring smooth operation and clearance. Attach the corresponding part of the slide to the base cabinet, ensuring proper alignment and stability. Finally, test the drawers to make sure they glide effortlessly and fit snugly within the cabinet.
Conclusion
Congratulations! You have completed the first part of the Jay Bates Miter Saw Station project. By breaking down the plywood, assembling the base cabinets, clearing out the space, removing the pegboard, cutting the support pieces, installing leveling feet, building the drawers, and installing drawer hardware, you are well on your way to creating a functional and organized workspace. In the next part of this series, we will explore further steps, including constructing the countertop, installing the miter saw, and adding additional features to enhance the station’s functionality. Keep up the good work, and soon you’ll have a miter saw station that will make your woodworking projects a breeze!


