


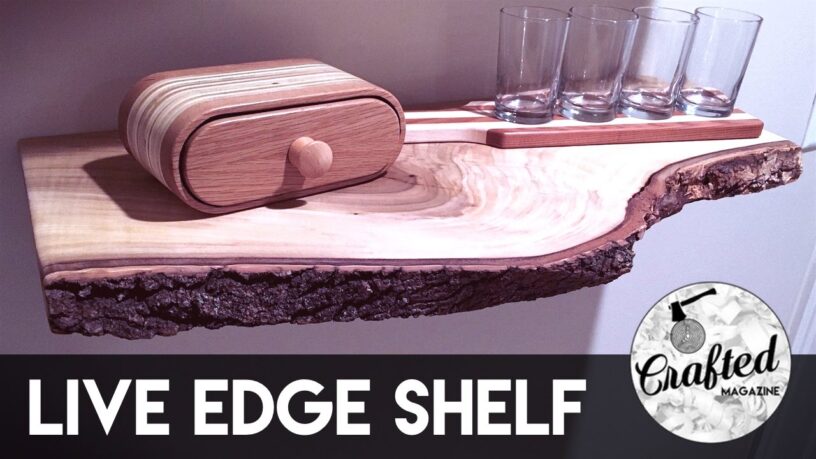
Hey there, everyone! In this Crafted Workshop video, Johnny Brook is back with another awesome project. He’s going to show you how to build some simple live-edge shelves, so make sure you stay tuned. The first step in this build involves trimming the width off of the slab and creating a clean straight edge. Johnny used a track saw, but you could also use a circular saw with a straight edge. After that, he flattened the slab a little bit and cleaned up the surface. The slab was too wide for his jointer, but skip planing got it close enough. Then, Johnny cut the pieces needed for the shelves from the larger slab using a miter saw and squared up each end. He decided to leave the bark on the slab since he really liked the look of it, but he reinforced a small section of loose bark with epoxy. Johnny sanded the shelves, rounded over the edges with a router, and finished them with Danish oil. Lastly, he mounted the shelves using brackets and attached them securely with screws. If you enjoyed this project, remember to give the video a thumbs up and leave a comment with your thoughts. And don’t forget to subscribe for more awesome project videos every Tuesday and weekly maker roundups every Thursday. Happy building!
Preparing the Slab

This image is property of i.ytimg.com.
Trimming the slab
The first step in building live-edge shelves is to trim a little width off of the slab and create a clean straight edge on one side. This can be done by using a track saw or a circular saw with a straight edge. In this project, an offcut from a larger slab was used, and any leftover epoxy from a previous build was removed with a chisel.
Removing epoxy
If there is any epoxy residue left on the slab, it can be removed using a chisel. Make sure to clean the surface thoroughly before proceeding to the next step.
Skip planing the slab
To achieve a roughly flattened surface, skip planing the slab is recommended. This involves taking a little bit off of each side of the slab, turning it over between passes until it is flat on both sides. If the slab is too wide for a jointer, skip planing can get it close enough to the desired flatness.
Jointing the edge of the slab
To square up one edge of the slab and make it flush with the face of the slab, jointing is necessary. This can be done using a jointer or a planer. By ensuring the edge is straight and square, it will provide stability for the shelves when mounted.
Cutting the Shelves
Squaring up the ends
Before cutting the shelves to length, it is important to square up each end. This can be done using a miter saw or any other saw with an accurate cutting guide. Ensuring the ends are squared up will result in shelves that fit together perfectly.
Cutting the shelves to length
Measure the desired length for the shelves and cut them accordingly. In this project, the shelves were cut to about 24 inches each. Double-check the measurements and make precise cuts to achieve the desired dimensions.

This image is property of images.unsplash.com.
Reinforcing loose bark
If there are any sections of loose bark on the slab that need reinforcement, a little five-minute epoxy can be used. Mix the epoxy, fill the gaps between the slab and the bark, and clamp it in place. This will help secure the bark and prevent any further loosening.
Sanding the shelves
Start sanding the shelves using various grits, starting with 80 grit and gradually moving to 120 grit. After sanding with 120 grit, round over the edges of the shelves using an eighth-inch radius round-over bit. Finish sanding with 180 grit to achieve a smooth surface.
Applying the Finish
Using Danish oil
For the finish on the shelves, Danish oil is recommended. Follow the instructions on the can for best results. Begin by flooding the surface with Danish oil and keeping it wet for the first coat. The wood will absorb a significant amount of oil on this coat.

This image is property of images.unsplash.com.
Flooding the surface
Continue flooding the surface with Danish oil until the wood stops absorbing it as quickly. Stay close by and keep a steady flow of oil to ensure even coverage. Danish oil provides a beautiful finish and enhances the natural beauty of the wood.
Letting the first coat dry
Allow the first coat of Danish oil to dry for about 30 minutes. The drying time may vary depending on the temperature and humidity levels in the workspace. Make sure the surface is completely dry before applying the second coat.
Applying the second coat
After the first coat has dried, apply a second coat of Danish oil following the same procedure as before. This will enhance the durability of the finish and give the shelves a rich, lustrous look.

This image is property of images.unsplash.com.
Buffing out imperfections
Once the finish has dried for about three days, lightly buff out any surface imperfections using a thousand-grit sanding pad. This will help achieve a smooth matte finish and remove any minor flaws.
Mounting the Shelves
Types of brackets used
In this project, two types of brackets were used for mounting the shelves. The first set of brackets tried were metal French cleats designed for hanging picture frames and canvases. However, they didn’t provide the necessary stability for the shelves due to their design.
Difficulty with floating brackets
Although floating brackets were initially desired for a more seamless look, they didn’t work well with the thickness of the shelves. They relied on resting on the back of the piece to provide stability, and the shelves were not thick enough for this type of bracket.
Using traditional brackets
As a solution, more traditional brackets were found at the local home center. These brackets were levelled and plumbed to ensure proper alignment. By attaching the shelves to the brackets using one-inch screws from below, a sturdy mounting system was achieved.
Attaching the shelves
Secure the shelves to the brackets using the appropriate screws or fasteners. Ensure that the shelves are securely attached and have a stable foundation. Double-check that everything is level and aligned before finalizing the attachment.
Leveling and plumbing the brackets
To ensure the shelves are level and straight, make sure to level and plum the brackets before attaching them to the shelves. This will provide a visually appealing and functional end result. Take the time to adjust and align the brackets if necessary.
Conclusion
Summary of the project
In this project, live-edge shelves were built using a slab of wood. The process involved trimming and cleaning the slab, cutting and sanding the shelves, applying a finish, and mounting the shelves using brackets. Despite a slight hiccup with the choice of brackets, the project was completed successfully.
Challenges faced
The main challenge faced in this project was finding the right brackets to achieve the desired floating look. The initial brackets used did not work well due to the thickness of the shelves. However, this challenge was overcome by finding alternative traditional brackets.
Final thoughts and recommendations
Building live-edge shelves can be a rewarding project, but it is important to plan and prepare accordingly. Consider the thickness and stability of the shelves when choosing brackets or mounting hardware. Take the time to sand and finish the shelves properly to achieve a smooth and durable surface. With proper attention to detail, the end result will be a beautiful display of natural wood in your living space.


