


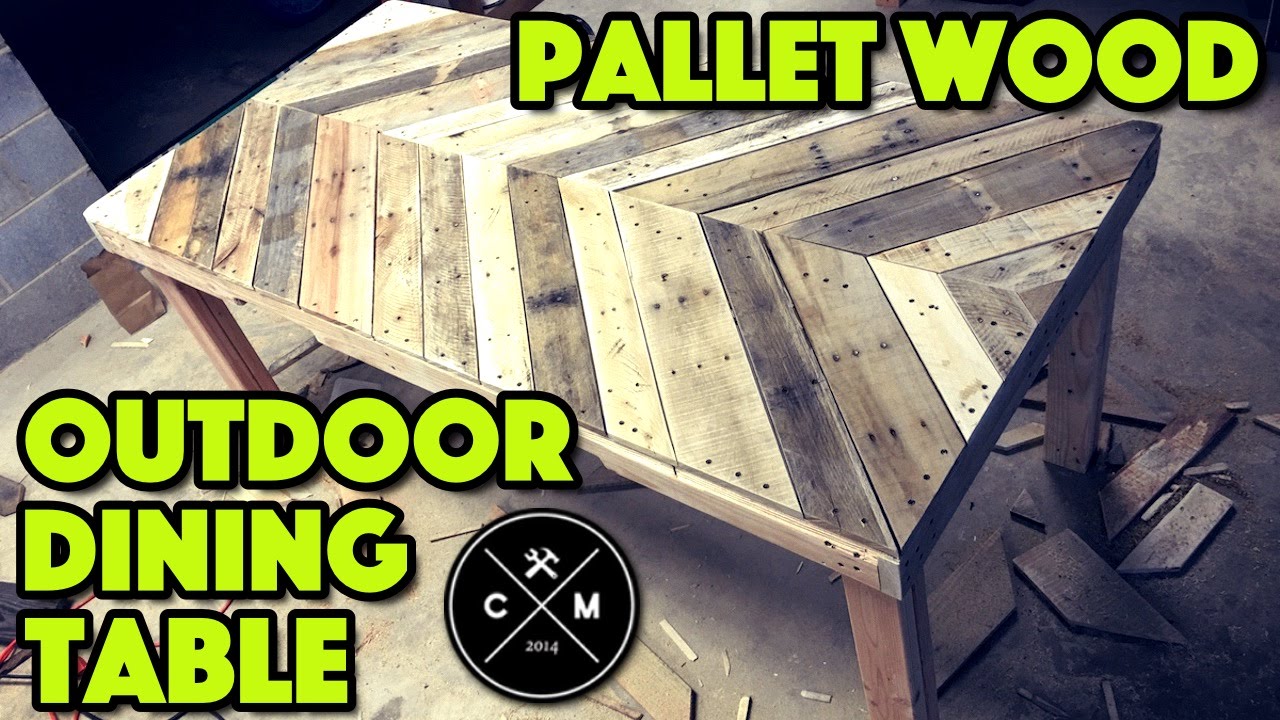
In this article, you’ll find a step-by-step tutorial on how to build an outdoor dining table from pallet wood. This project is perfect for beginners and requires simple tools like a circular saw and a reciprocating saw. The video takes you through the entire process, from disassembling the pallets to assembling the frame and attaching the slats. The builder also shares helpful tips on preventing splitting and ensuring sturdiness. The table is made with free materials; the only costs involved are deck screws and finish. This article is a must-read if you’re looking for a cost-effective and DIY-friendly way to create a stylish outdoor dining table. The builder also encourages you to subscribe to their YouTube channel and check out their Crafting magazine app for more DIY content. Happy crafting!

This image is property of i.ytimg.com.
Materials and Tools
To build your own pallet wood table, you will need the following materials and tools:
Pallet wood
Pallet wood is a versatile and cost-effective material for creating rustic furniture. Look for pallets that are made of sturdy, untreated wood for the best results.
Circular saw
A circular saw is handy for cutting through the pallet wood and creating precise measurements. Make sure you have a sharp blade and use caution when operating the saw.
Reciprocating saw
A reciprocating saw will come in handy for disassembling the pallet. It is designed to cut through nails, making it easier to remove the slats without damaging the wood.
Hex screws
Hex screws are strong and durable fasteners that securely hold the table together. Make sure to choose the appropriate size for your project.
Deck screws
Deck screws are used to attach the tabletop slats to the frame. They must be weather-resistant to ensure the longevity of your table.
Helmsmen spar urethane
To protect your pallet wood table from the elements, you will need to apply a weatherproof finish. Helmsmen spar urethane is popular as it provides a clear, protective coating.
Measuring tape
Accurate measurements are crucial when building a table. Use a measuring tape to ensure the correct dimensions for your project.
Pencil
A pencil will come in handy for marking measurements and cutting lines on your pallet wood.
Drill
A drill is essential for creating pilot holes and attaching screws. Make sure to have the appropriate drill bits for your project.
Clamps
Clamps will hold the slats in place while you secure them to the frame. They are important for ensuring a tight and secure fit.
Preparing the Pallet Wood
Before you can begin building your table, you need to prepare the pallet wood. Follow these steps to get your wood ready for construction:
Disassembling the pallet
Carefully cut through the nails that hold the slats together using a reciprocating saw. Make sure to wear protective gloves and goggles while doing this to avoid injury.
Removing nails
Once the slats are separated, use a hammer or pry bar to remove any remaining nails. Take your time and be thorough to ensure the safety and quality of the wood.
Sanding the wood
To create a smooth surface, sand each slat with coarse, medium, and fine-grit sandpaper. This will remove any rough edges or splinters and prepare the wood for staining or painting.
Cutting the slats to size
Measure and mark the desired dimensions for your tabletop slats. Use a circular saw to cut the slats to the correct length and width.
Arranging the slats in a chevron pattern
Arrange the slats in a chevron or herringbone pattern to add visual interest to your table. Experiment with different layouts to find the design that you like best.
Building the Legs
Now that the pallet wood is prepared, it’s time to build the legs for your table. Follow these steps for sturdy and stable legs:
Cutting down two by fours
Measure and mark the desired length for your table legs on two by fours. Use a circular saw to cut the pieces to size.
Measuring and marking the leg lengths
Measure and mark the desired length for each leg. Take into account any angles or adjustments needed for stability.
Cutting the legs
Cut the legs to the marked lengths using a circular or miter saw. Be sure to make clean and precise cuts for a professional finish.
Creating angled cuts for stability
To ensure stability, create angled cuts on the bottom ends of each leg. This will provide extra support and prevent wobbling.
Assembling the Frame
With the legs ready, it’s time to assemble the frame of your table. Follow these steps for a sturdy and durable frame:
Measuring and marking the dimensions
Measure and mark the dimensions for your table frame on the pallet wood slats. Take into account any overhang or desired inset for the tabletop.
Cutting the frame pieces
Using a circular saw, cut the frame pieces to the correct lengths. Make sure to double-check your measurements before cutting.
Drilling pilot holes
Drill pilot holes in the frame pieces to prevent the wood from splitting. Use a drill bit that is slightly smaller than the diameter of your hex screws.
Attaching the frame using hex screws
Align the frame pieces according to your measurements and secure them together using hex screws. Make sure to tighten the screws securely for a sturdy frame.
Adding center support for stability
To provide additional stability, add a center support beam to the frame. Attach it securely with hex screws to ensure the table can support heavy items.

This image is property of images.unsplash.com.
Attaching the Tabletop
The tabletop is the centerpiece of your pallet wood table. Follow these steps to attach the slats securely:
Measuring and marking the tabletop dimensions
Measure and mark the desired dimensions for your tabletop on the frame. Take into account any overhang or desired inset.
Cutting excess wood with a circular saw
If you have any excess wood extending beyond the frame, use a circular saw to cut it off. This will create a neat and clean appearance for your tabletop.
Positioning and clamping the slats to the frame
Arrange the slats in the desired pattern on top of the frame. Use clamps to secure them in place, ensuring they are evenly spaced and aligned.
Pre-drilling holes for deck screws
To prevent the wood from splitting, pre-drill holes in the slats where you will attach them to the frame. Use a drill bit that is slightly smaller than the diameter of your deck screws.
Securing the slats to the frame with deck screws
Using a drill or screwdriver, secure the slats to the frame using deck screws. Make sure to tighten the screws securely, but be careful not to over-tighten and damage the wood.
Adding Additional Support
For added durability and support, consider adding additional support pieces to your table. Follow these steps:
Identifying splitting slats
Inspect the slats on your tabletop for any signs of splitting or weakness. These slats will benefit from additional support.
Cutting support pieces
Measure and cut support pieces from the pallet wood to fit between the slats that need reinforcement. Make sure they are the right length and angle to provide support.
Positioning and attaching the support pieces
Position the support pieces under the splitting slats, making sure they fit snugly. Use screws or nails to attach them securely, reinforcing the weak areas of the tabletop.

This image is property of images.unsplash.com.
Finishing Touches
With the construction of your pallet wood table complete, it’s time to add some finishing touches to enhance its appearance and protect it from the elements:
Sanding any rough edges
After assembly, sand any rough or uneven edges to create a smooth surface. This will give your table a polished and professional look.
Applying Helmsmen spar urethane for weatherproofing
Apply a coat of Helmsmen spar urethane to protect your table from the elements. Follow the manufacturer’s instructions for application and drying times.
Allowing the finish to dry thoroughly
Make sure to allow the Helmsmen spar urethane to dry thoroughly before using your table. This will ensure that the finish has properly cured and provides optimum protection.
Final Steps
Before enjoying your new pallet wood table, there are a few final steps to take:
Cleaning up the work area
Tidy up your work area by removing any leftover wood scraps or debris. Dispose of them properly or save them for future projects.
Checking the table for stability
Give your table a thorough inspection to ensure it is stable and level. Shake it gently and check for any wobbling or unevenness.
Making any necessary adjustments
If you notice any stability issues or unevenness, make the necessary adjustments. Tighten screws, add additional support, or level the table as needed.
Testing the table’s weight capacity
To ensure that your table can withstand the weight of items placed on top, test its weight capacity. Place heavy objects on the tabletop and see how well it holds up.

This image is property of images.unsplash.com.
Summary
Building a pallet wood table is a simple and affordable project that is suitable for beginners. By following these steps and using the right materials and tools, you can create a beautiful and functional piece of furniture for your home or outdoor space. Remember to subscribe to our YouTube channel and Crafting magazine app for more content and project ideas. Happy building!


